Getting Started with One AI
This guide first explains how to set up ONE AI and then explains all features and how to get the best out of your AI. But ONE AI is intelligent enough, so you don't need to understand each setting to get very good results that usually exceed all universal AI models. If you then also follow all information on this site, you can get even better results that often exceed the work of human experts. On the left, you can find more tutorials with datatset examples and more detailed explanation on how to set parameters.
If you have any questions: Don't hesitate to ask our team for help via mail: support@one-ware.com or you can ask in our Discord for ONE WARE Studio and ONE AI. This helps us as well, because we then know what tutorials we can do next.
1. Setup
We have a cloud service and a software that runs on your PC locally. This ensures maximum performance. In this setup, we guide you through the installation process.
1.1. Sign Up
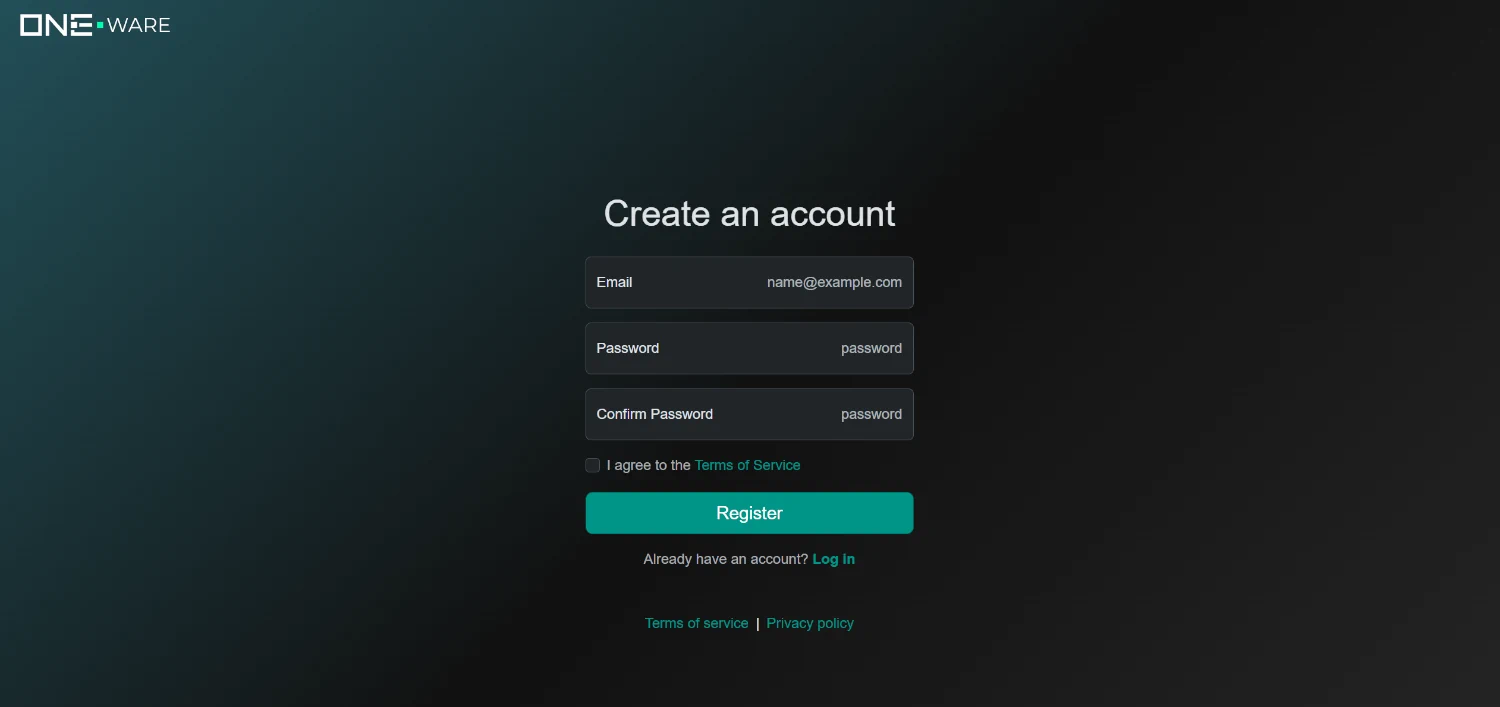
To get access to our cloud infrastructure and AI model prediction, you need to create an account for the ONE AI cloud here. This is free and your data is stored securely on our own servers in germany. If you work with sensitive data, you can contact us via mail: sales@one-ware.com, so we can provide a local training service for your servers that ensures the data doesn't leave your company. In the ONE AI software, until you actually train the AI model, all data is stored locally on your PC. So you can still first create an account and test all settings until we can provide your local training service.
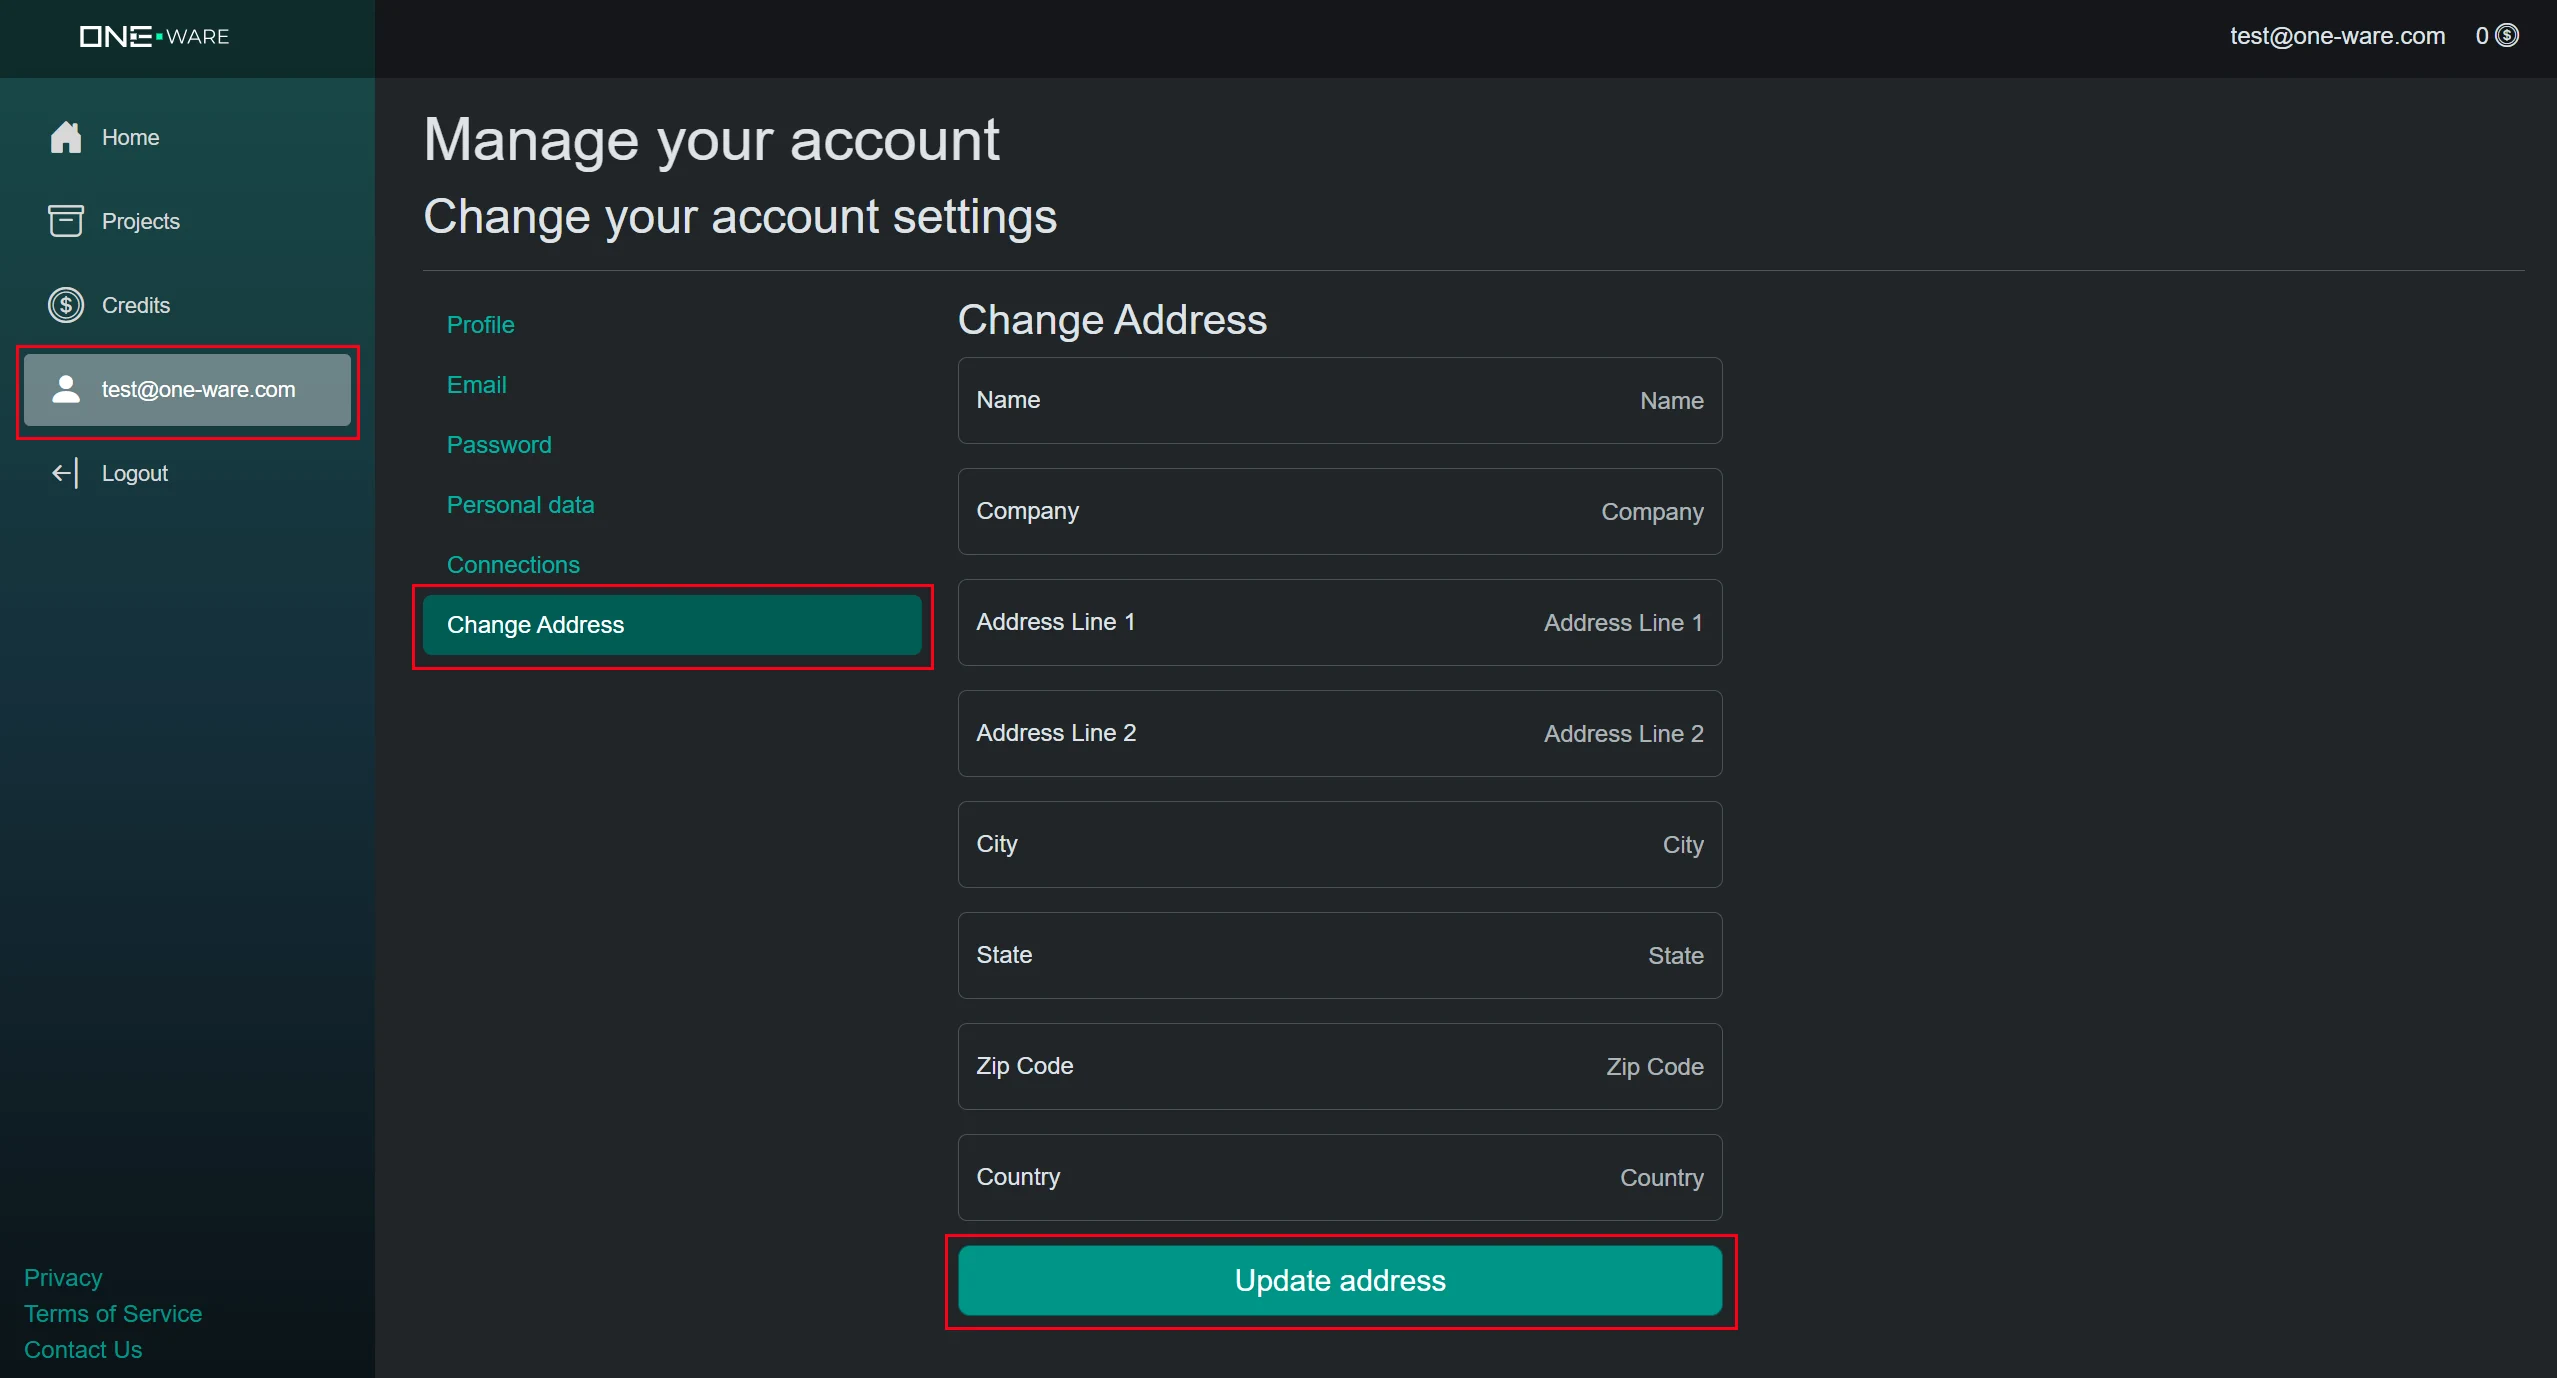
1.2. Verify Address to Get Free Credits
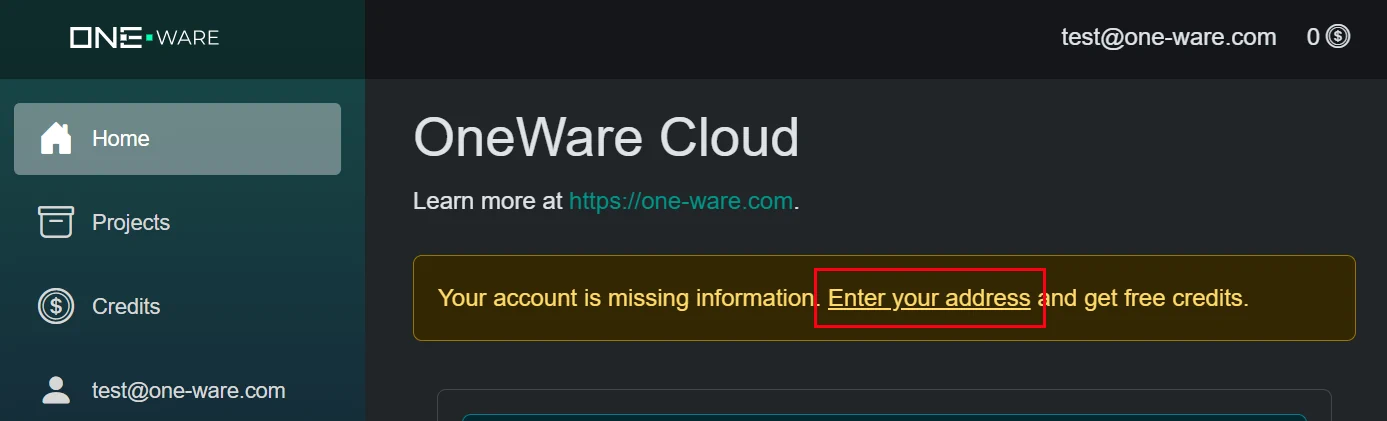
After you have access to the ONE AI cloud, you can get 25.000 credits worth 500 € for free. You only need to go to your account settings and save your address. You won't be changed with any fees. The address is only needed to check for trade restrictions and general company verification. It will take a bit for the verification (up to one business day), but you can continue with the next steps until you have your free credits for training.
1.3. Download ONE WARE Studio
Next you need to install our software locally on your PC, so you can experiment with your data safely and without the need for data upload. You can download it here for windows, linux and macOS.
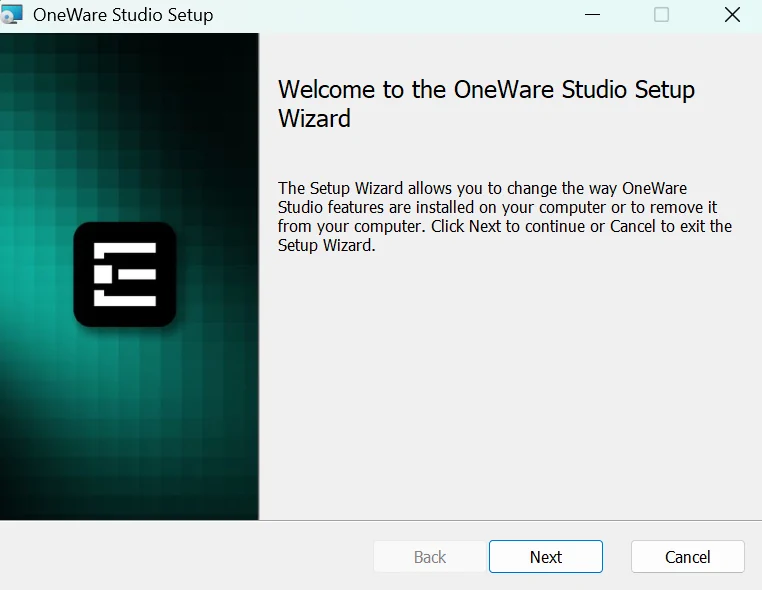
You simply need to follow the installer and start ONE WARE Studio after you finished the installation process.
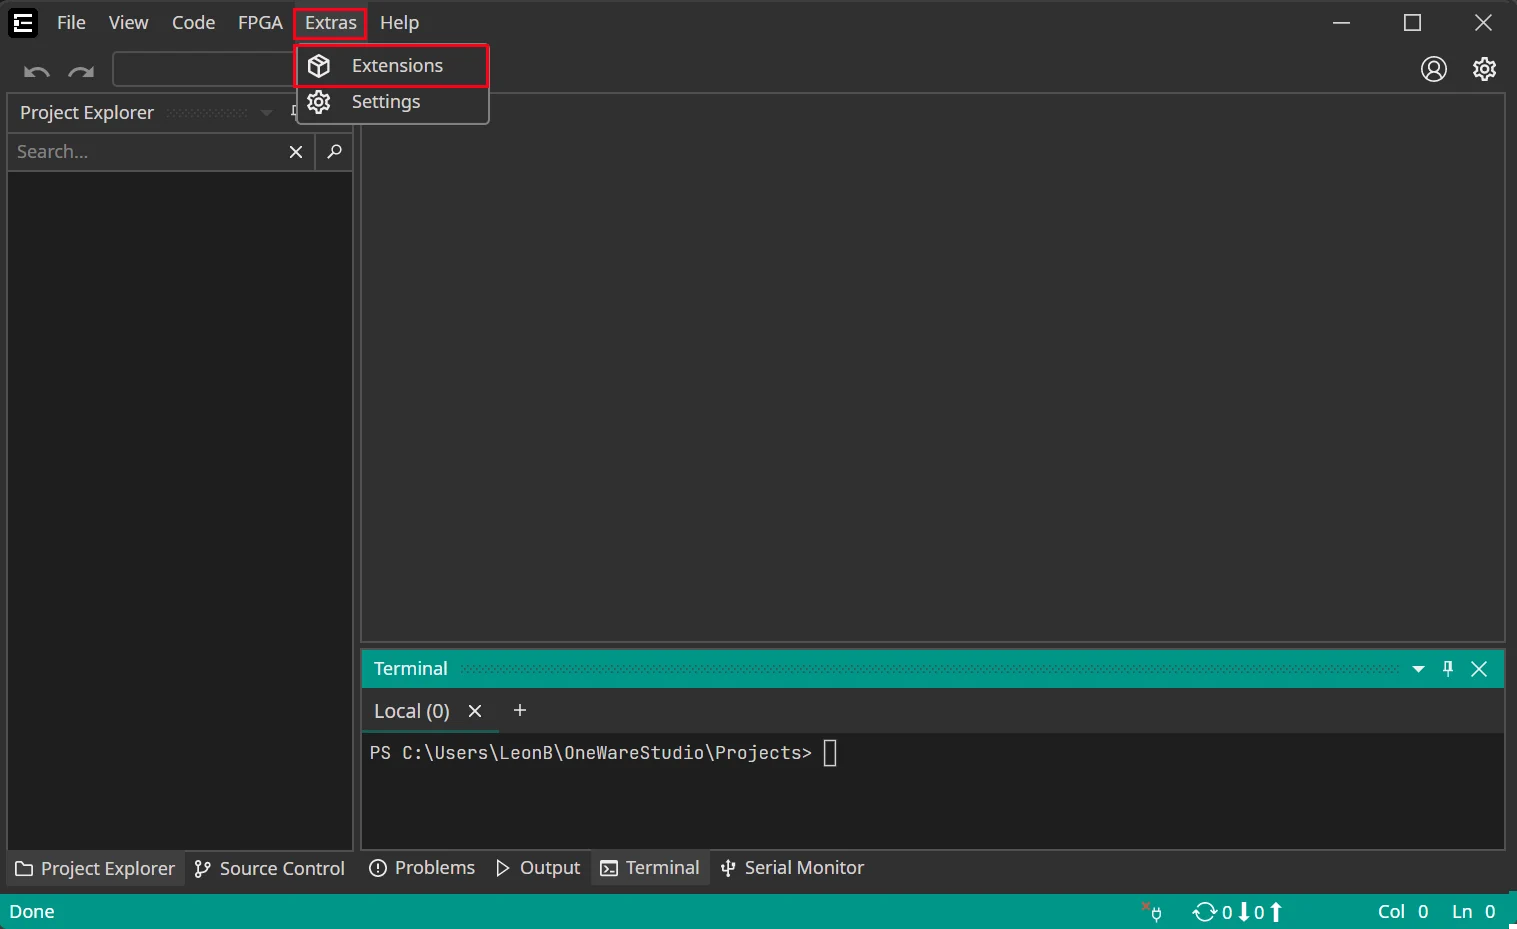
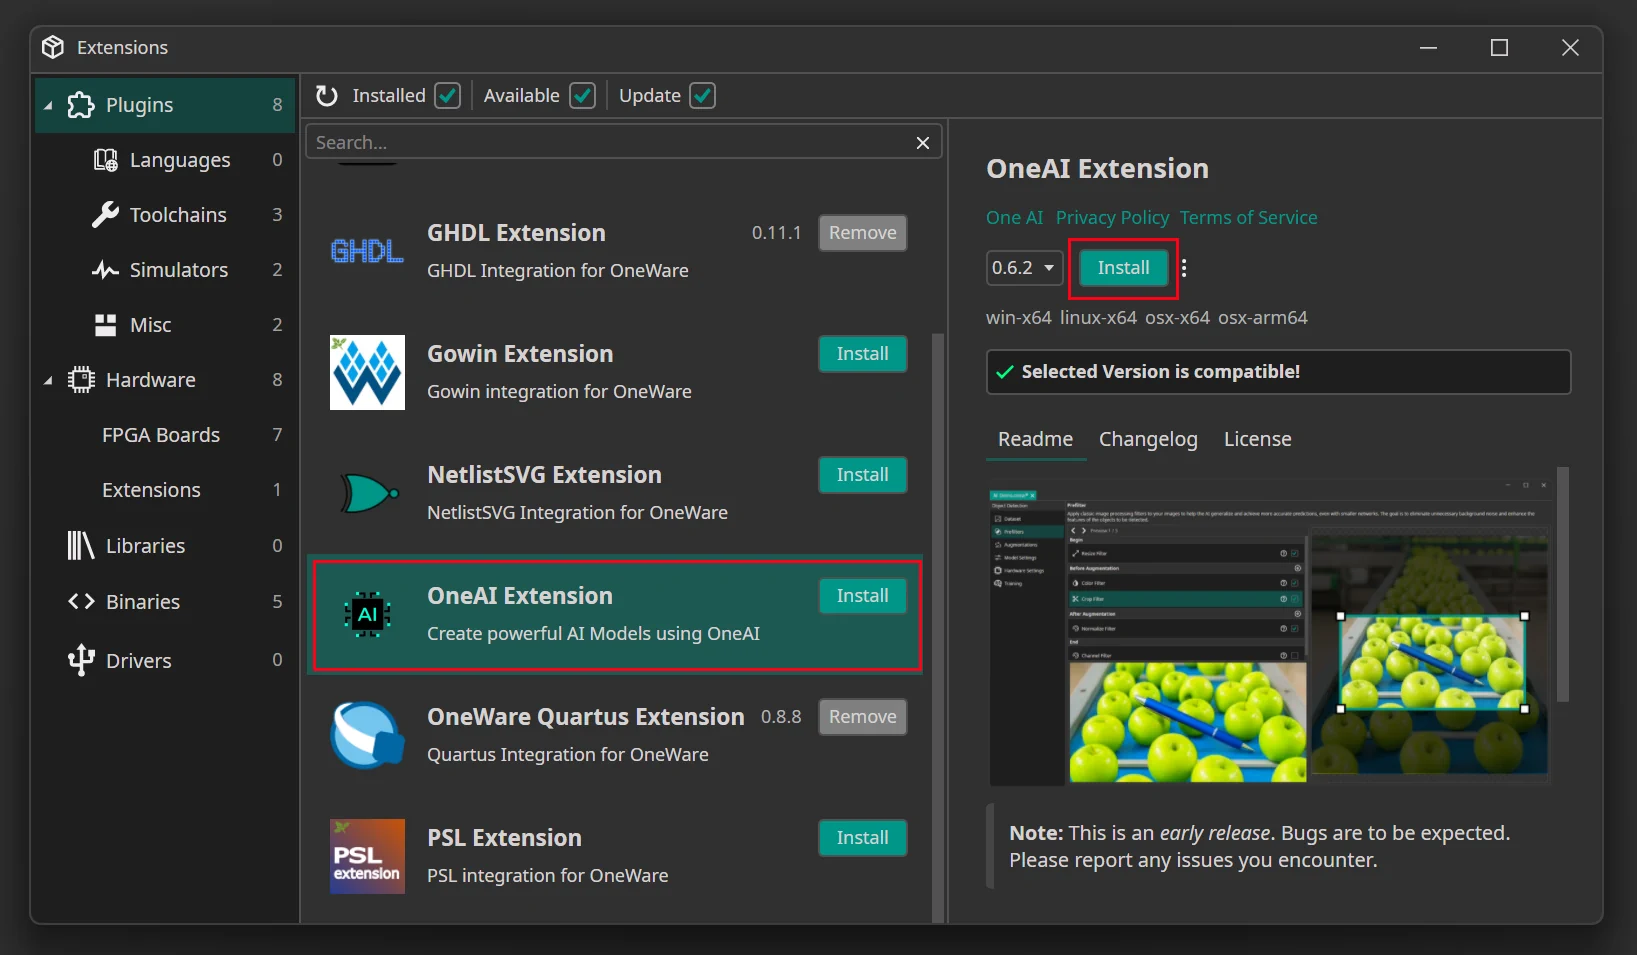
1.4. Install ONE AI Extension
ONE WARE Studio is open source and multiple extensions exist to use it as development platform for any kind of AI, software, firmware or FPGA development.
Click on Extras > Extensions to get to the extension manager that lets you personalize ONE WARE Studio for your development needs.
In the extension manager, install the ONE AI extension. This includes everything you need to develop AI models for any kinds of hardware without the need to be an AI expert.
1.5. Connect to ONE AI Cloud
The last step of the setup process is to connect ONE WARE Studio with the ONE AI Cloud. Click on the Account button on the top right and then on Login.

Here, you need to enter the email and password you used to login to the ONE AI Cloud earlier.
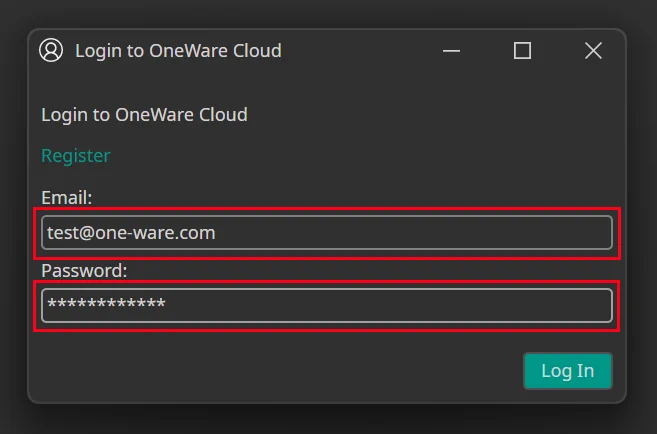
After you click on Log In, you should see that your account is now connected in ONE WARE Studio, so you can use the ONE AI services.

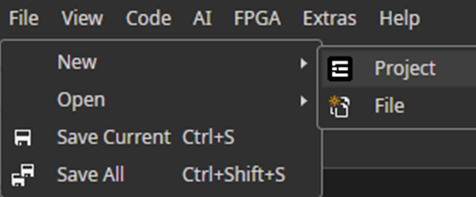
2. Create a New Project
Open the Project Creator by clicking on File -> New -> Project
Set Project Options
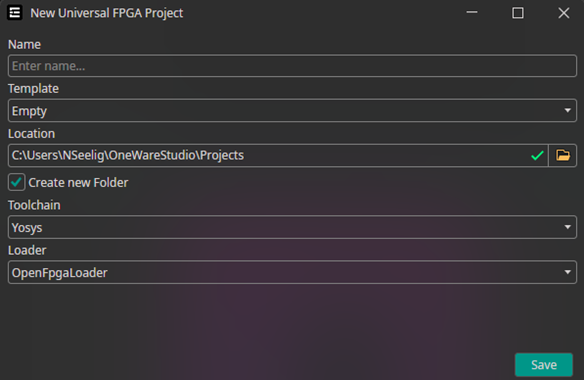
You need to specify the name.
The other settings are only important if you want to program an FPGA.
You can find more information about that here.
3. Initialize the AI Project
Make sure that the correct project is selected before you create a new AI project.

Navigate to the AI tab and choose Open AI Generator.
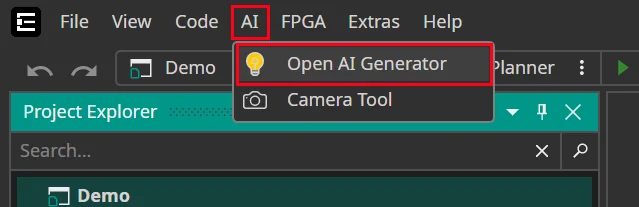
Enter your AI Project Name and choose the AI Type.
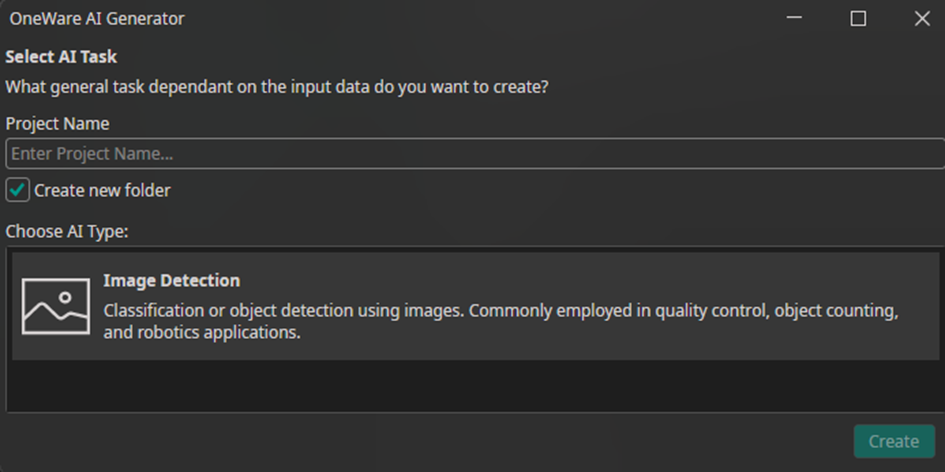
Note: Currently, only “Image Detection” is available as the AI type.
4. Dataset Preparation
Before you start training your model, you need to load and organize your image data. A clean and well-labeled dataset is the foundation for accurate AI performance.
4.1 Load Your Images
Access the Dataset tab in your ONE AI workspace to prepare your visual training data.
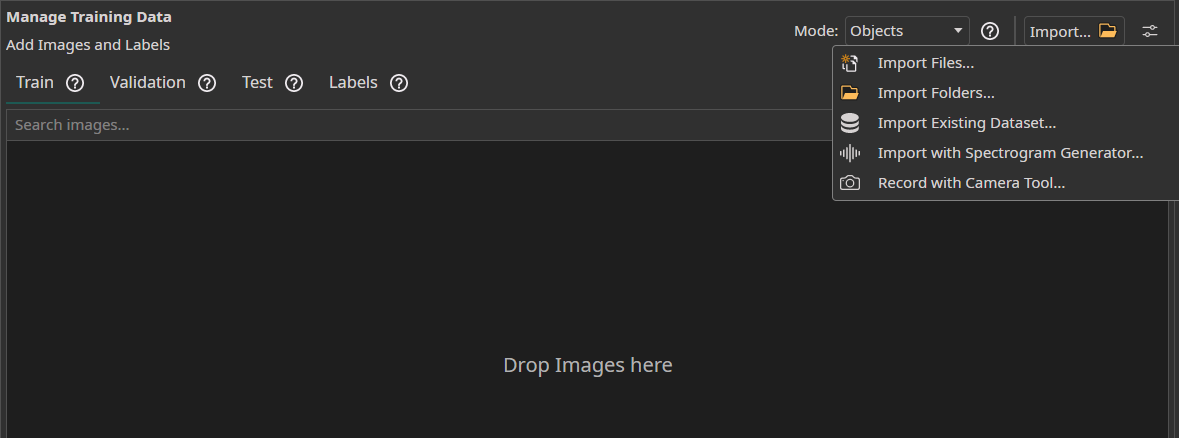
- You can simply drag and drop your image files to import them.
- You can
Import FilesorImport Foldersto load unlabeled image data directly from your device. - The
Import Datasetfeature can be used to load a labeled dataset. - You can use the
Camera Toolin theAItab to capture images directly within ONE AI for real-time data collection. - You can use the
Spectrogram Generatorto convert audio or time series data to images.
Dataset Import
When you press the Import Existing Dataset button, the following window opens:
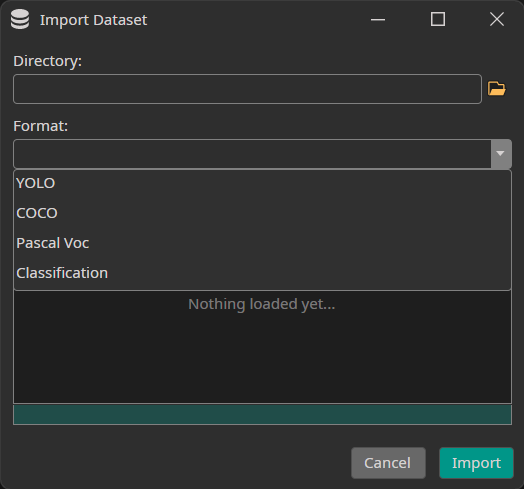
You need to select the directory to import as well as the format of your annotations. Currently, we support the formats YOLO, COCO and Pascal Voc as well as Classification datasets that contain one directory for each class.
Check out our examples like if you don't have a dataset and want to try ONE AI:
Camera Tool
You can use OneWare Studio's integrated Camera Tool to record images for your dataset. The camera tool allows you to configure camera settings and record images from multiple cameras simultaneously.
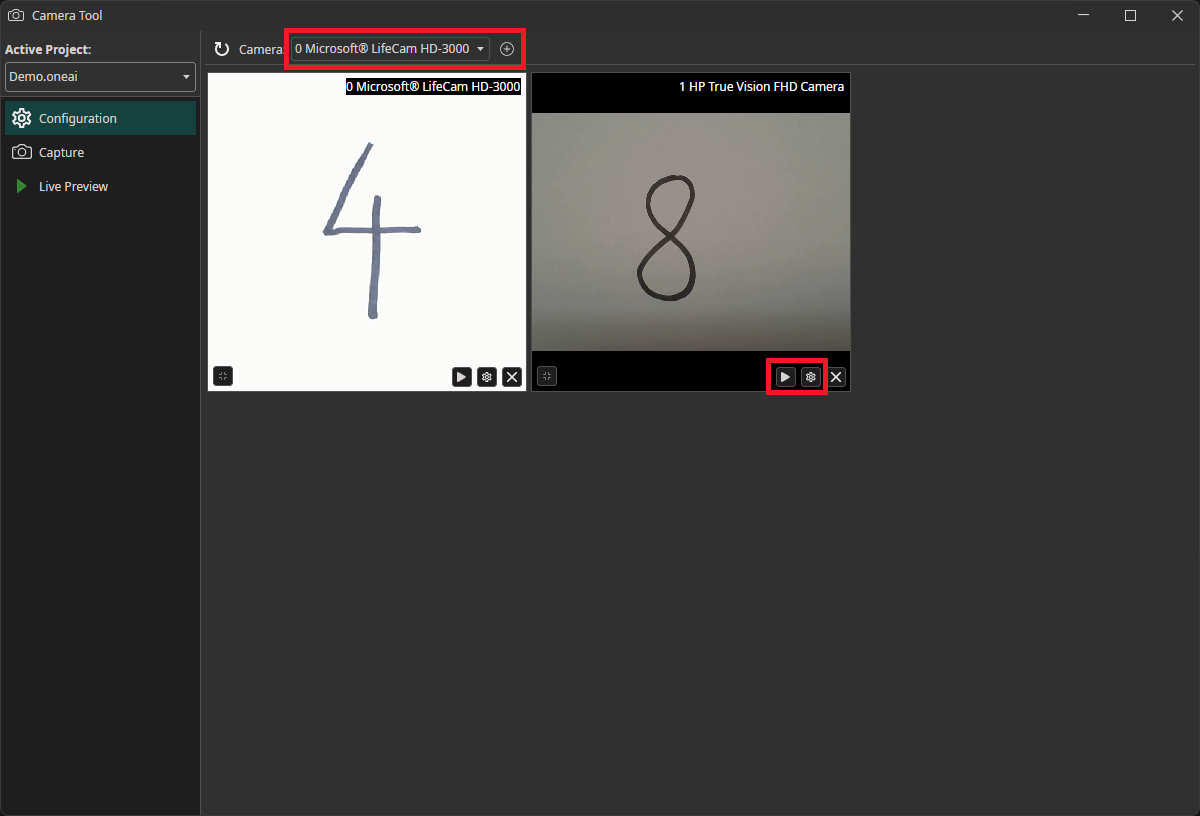
When you start the camera tool, you first need to add the cameras to your workspace. Select the camera that you want to use in the dropdown menu and click on the plus icon. You can use the play icon on the bottom of the camera window to start and stop the live preview. By clicking on the gear icon, you can enter the camera configuration menu.
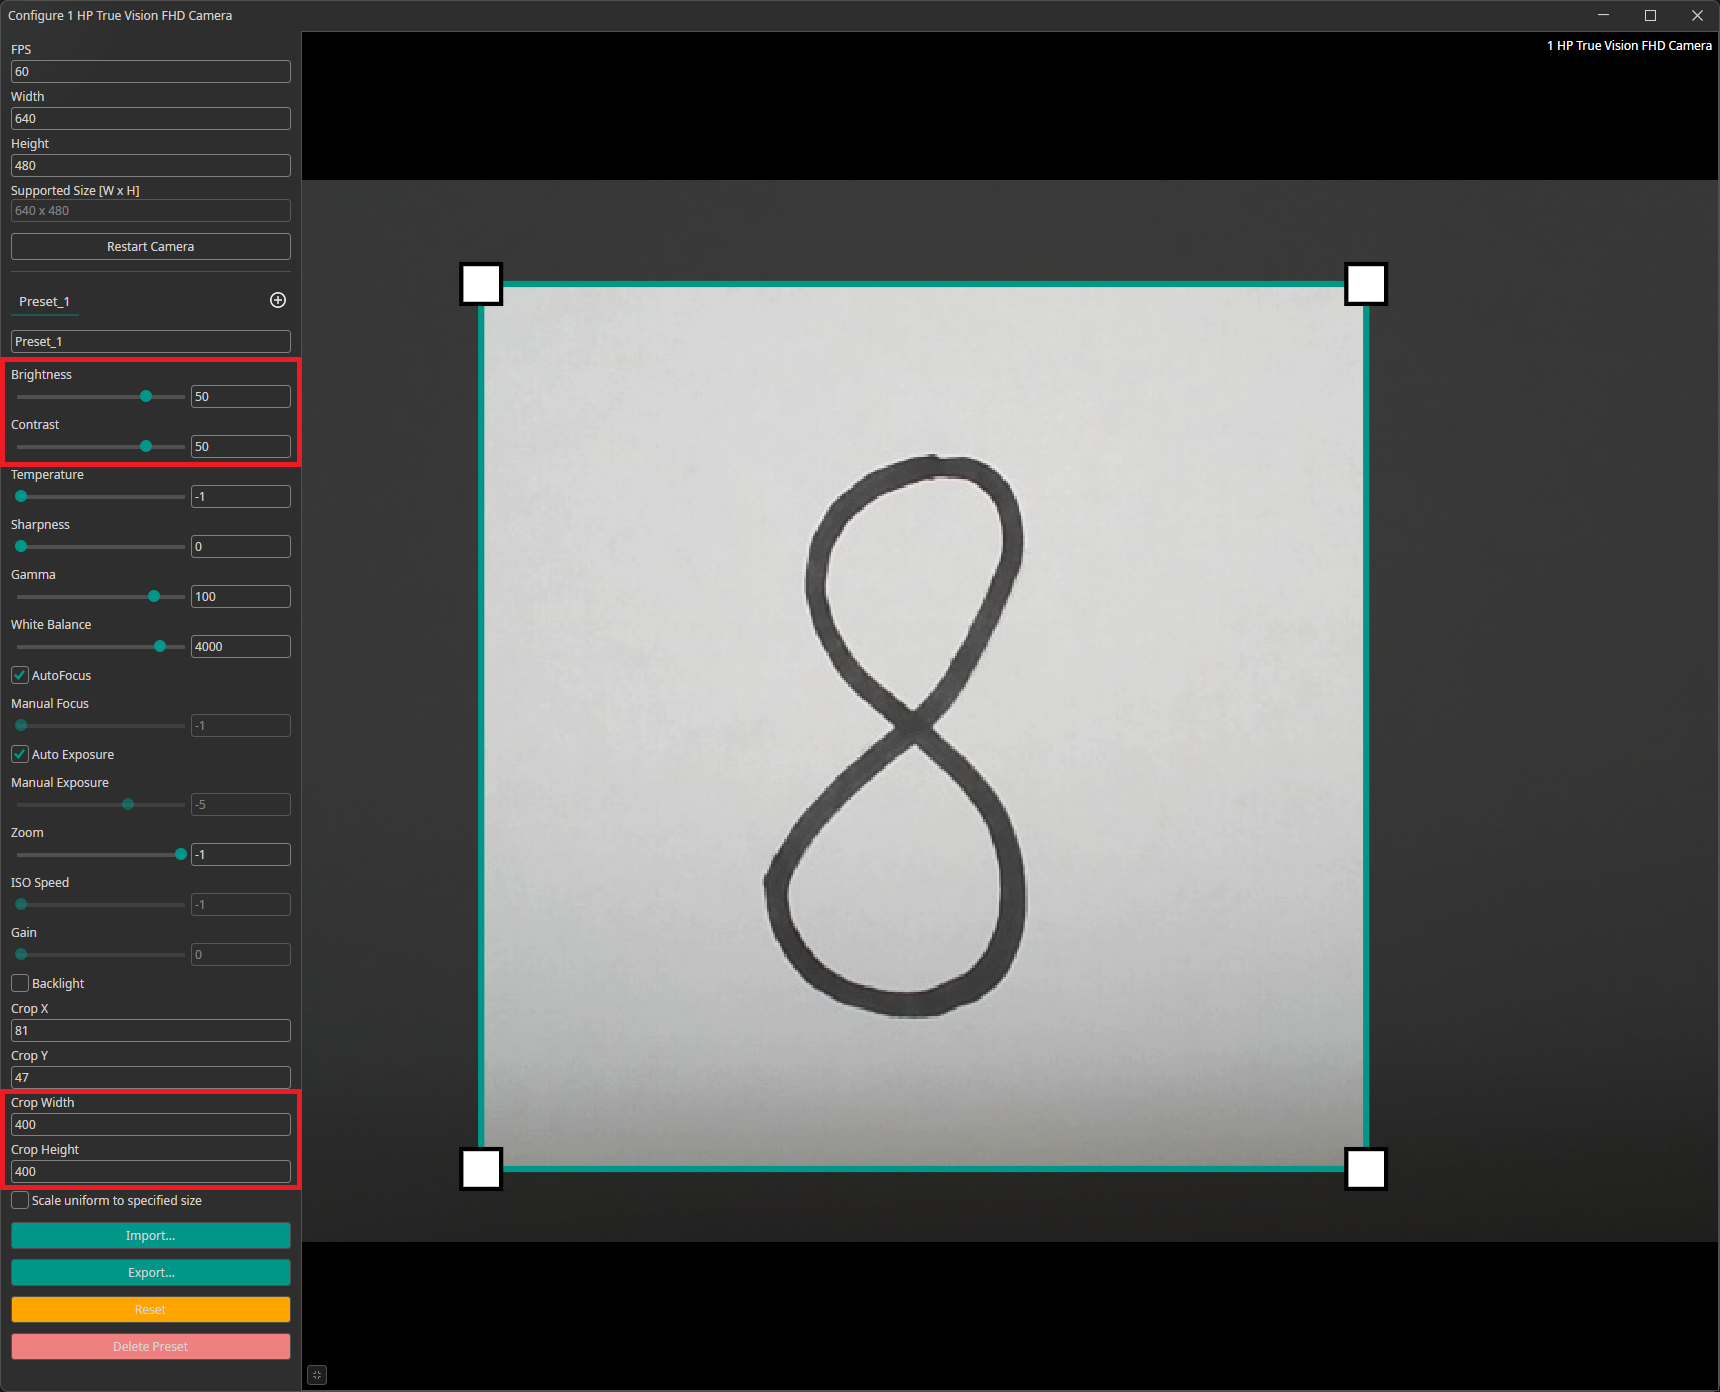
The camera configuration menu allows you to customize your camera settings. You can create different presets that can be exported and imported. You are also able to crop the image. You can draw the area you are interested in onto the preview or set its coordinates at the bottom of the settings list.
For our example, we increased the the camera's brightness and contrast. This brightens the white background and makes it easier for the AI model to recognize the numbers. We also added a crop to select a square region from the rectangular camera image.
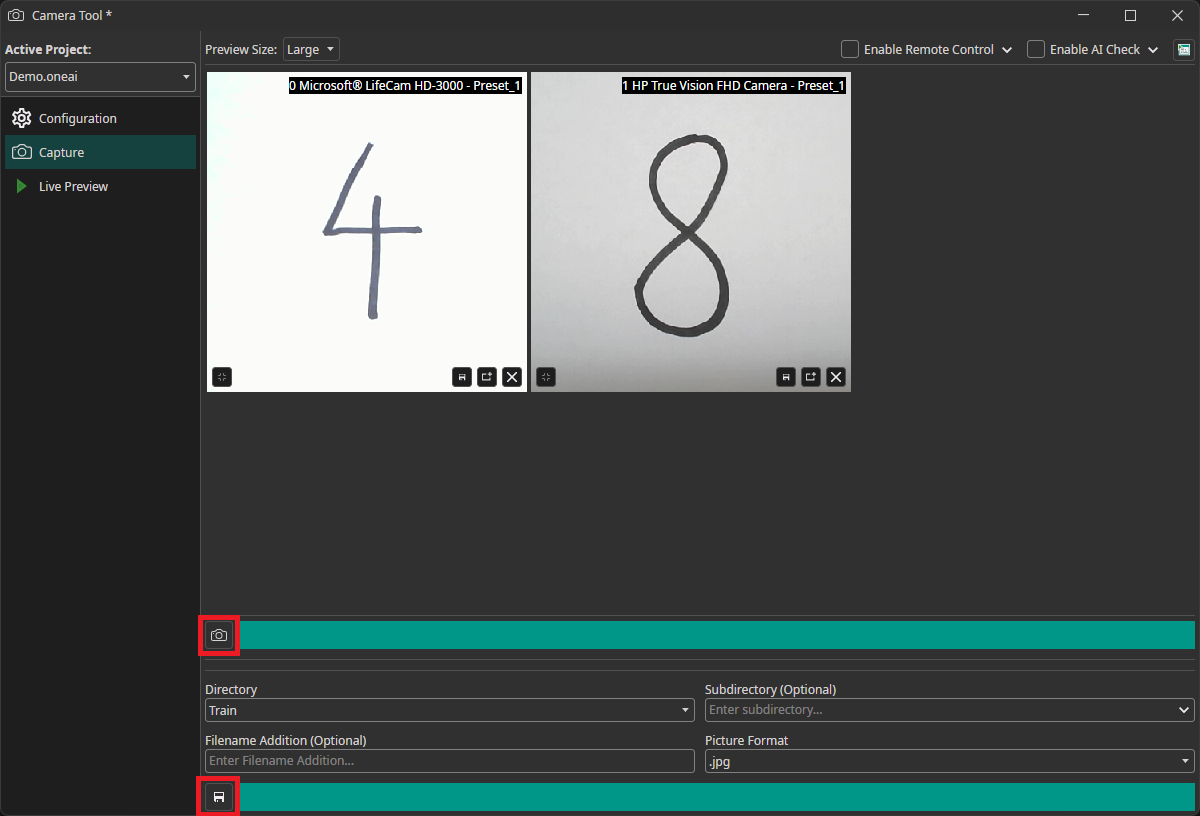
To record images, we need to go to the Capture tab. You can record images by clicking on the camera icon, which updates the preview. This records an image from all cameras simultaneously. You need to select the directory where you want to add them and click on the save icon to save them. The images are automatically named with the timestamp they were captured at, so you don't need to enter names manually.
Spectrogram Generator
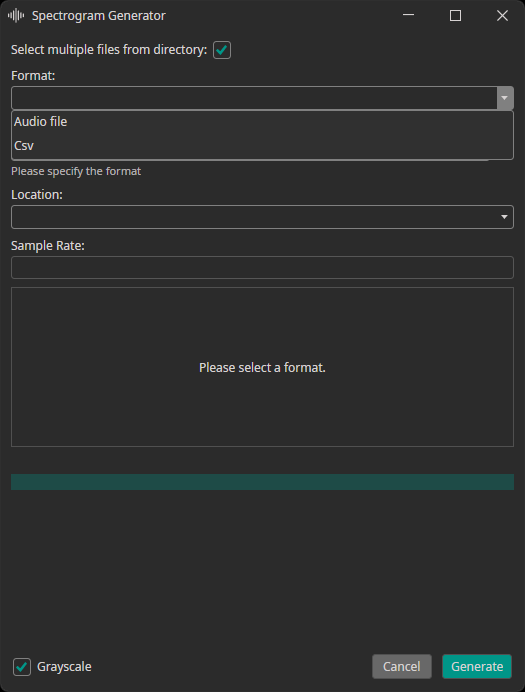
The spectrogram generator supports converting audio or CSV files to spectrogram images. You can decide, whether the generated spectrograms are added to the train, test or validation dataset. Furthermore, you need to provide the sampling rate of your data.
4.2 Choose Labeling Mode

Classes: Each image is assigned to one or more classes.Objects: Individual objects are selected in the images by drawing boxes around them.
4.3 Divide Your Dataset
Dividing your data into separate subsets is crucial for building reliable AI models. Follow these steps to split your data effectively.
Training Set
The training set teaches your AI what to recognize - it's your model's foundation.
Use about 70% of your total dataset with properly labeled images. Ideally it should include at least 50 images per class. More variety means better real-world performance.
Validation Set
The validation set monitors your model's performance on unseen data during training.
This evaluates performance without direct training involvement. Labels are required for the validation set as well to monitor the AI performance on unseen data while training.

Using Validation Split: If you don't have separate validation images, you can enable Use Validation Split to auto-divide your training set:
- 20% for standard datasets
- 30% for small datasets
- 10% for large datasets
Test Set
The test set provides a final performance evaluation after training. It is important to keep this set completely separate from training and validation data to get an objective evaluation. Providing labels is optional but highly recommended. Otherwise, you need to manually look through the predictions instead of getting a quantitative result.
To get an accurate evaluation on how the model will perform for your application, it is important to ensure that the test data represents the real-world deployment conditions. This organized approach ensures your AI model will be robust, accurate, and ready for real-world deployment with ONE AI.
If you don't have a separate test dataset, you can use the images from the train or validation dataset to test your AI. Because ONE AI only uses the validation dataset to stop the training when there is no more improvement and not for hyperparameter settings, the results should not be too far off, if you use the validation dataset for the final evaluation.

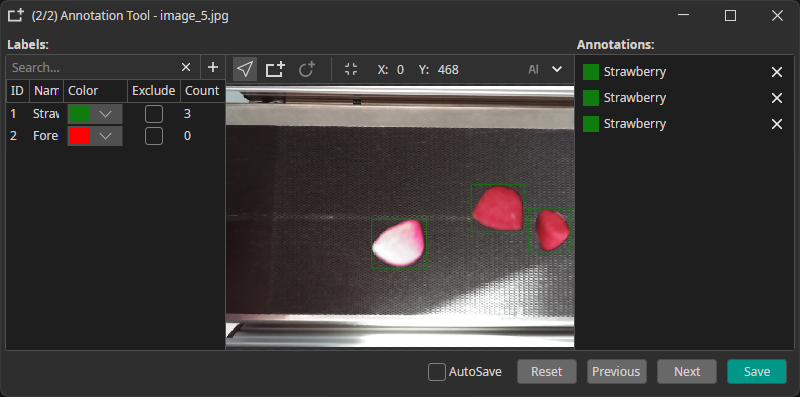
4.4 Add Your Labels
Open the Labels tab and create labels for each class you want to detect, e.g. "defect" or "strawberry". You can assign unique colors to make the annotation process faster and easier.
The two Label Modes
-
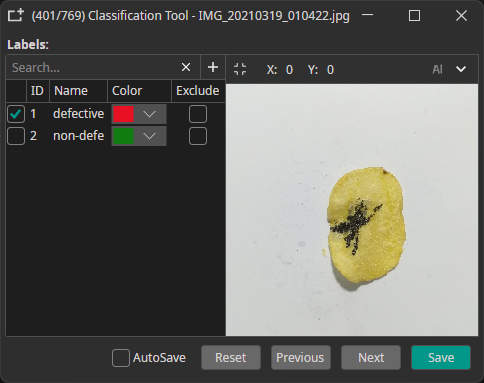
Classes: Assign classes to entire images.
Example: "defective" or "non-defective" for quality control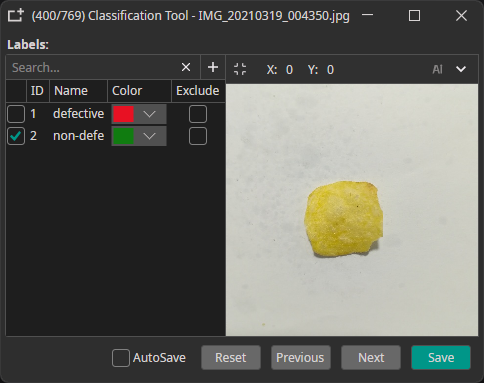
-
Objects: Mark specific objects by drawing bounding boxes. It is possible to annotate multiple objects and labels per image.
Example: individual boxes for "Strawberry" or "Foreign Object"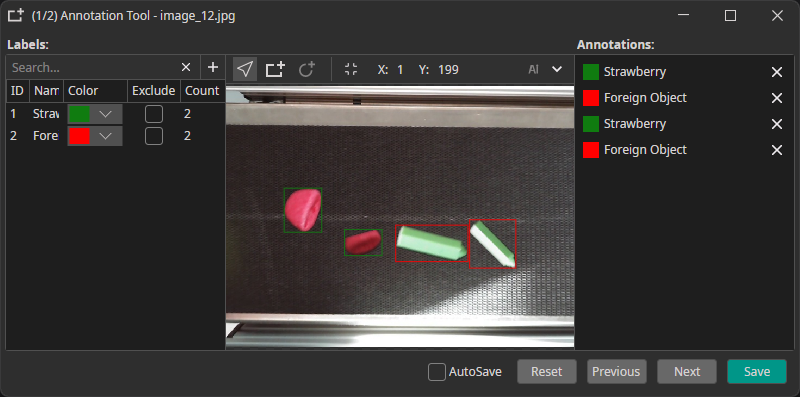
5. Prefilters
You can add prefilters before or after applying augmentations to process your dataset and boost model performance.
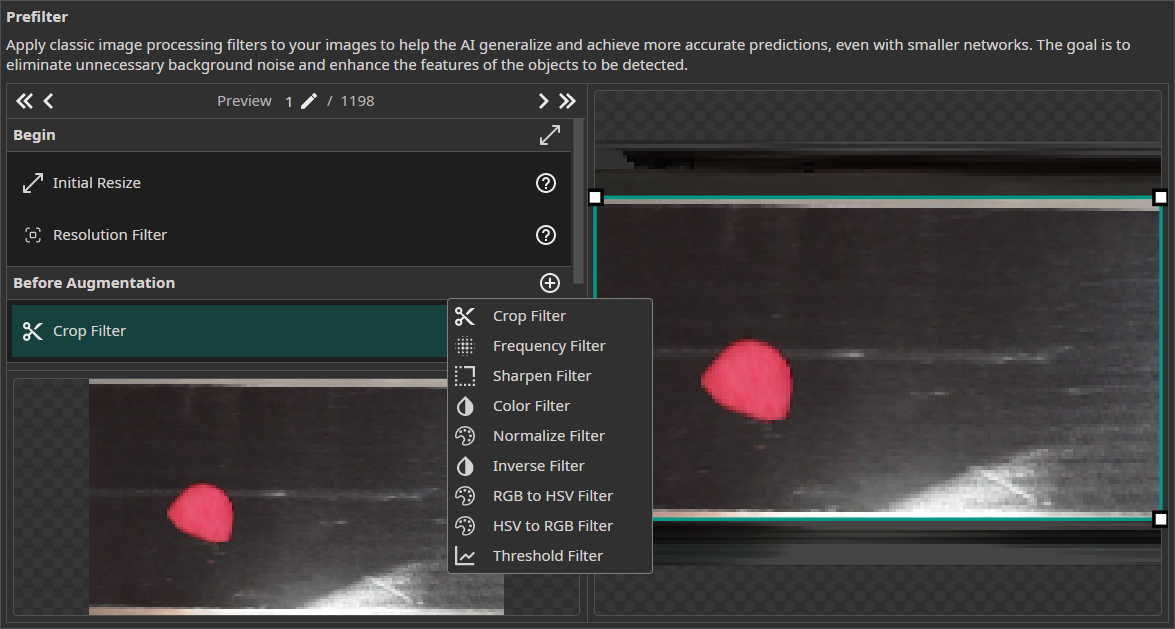
On the right, you can see the settings for the selected prefilter as well as a preview on how it will affect the image. The image on the bottom left shows a preview of your complete prefilter pipeline.
The Steps in the Data Processing Pipeline
Begin: The filtersInitial ResizeandResolution Filterare used to bring all images to the same size and optionally scale them down.Before Augmentation: You can choose from a varied selection of filters that are applied before augmentation is applied to the images. Typical examples are theColor Filterfor applying color correction or theCrop Filterfor cropping the images to the relevant area.Static Augmentations: The augmentations are divided into two groups. The static augmentations are applied first and have a fixed order.Dynamic Augmentations: The order of the dynamic augmentations can be changed and you can even apply the same augmentation multiple times.After Augmentation: You have the option to add additional filters that are applied after the images are augmented. For example, you could use aFrequency Filterto reduce noise or apply aThreshold Filterto convert your images to a binary representation.End: In the last step, you have the option to remove individual color channels with theChannel Filter.
Image Resolution
Initial Resize
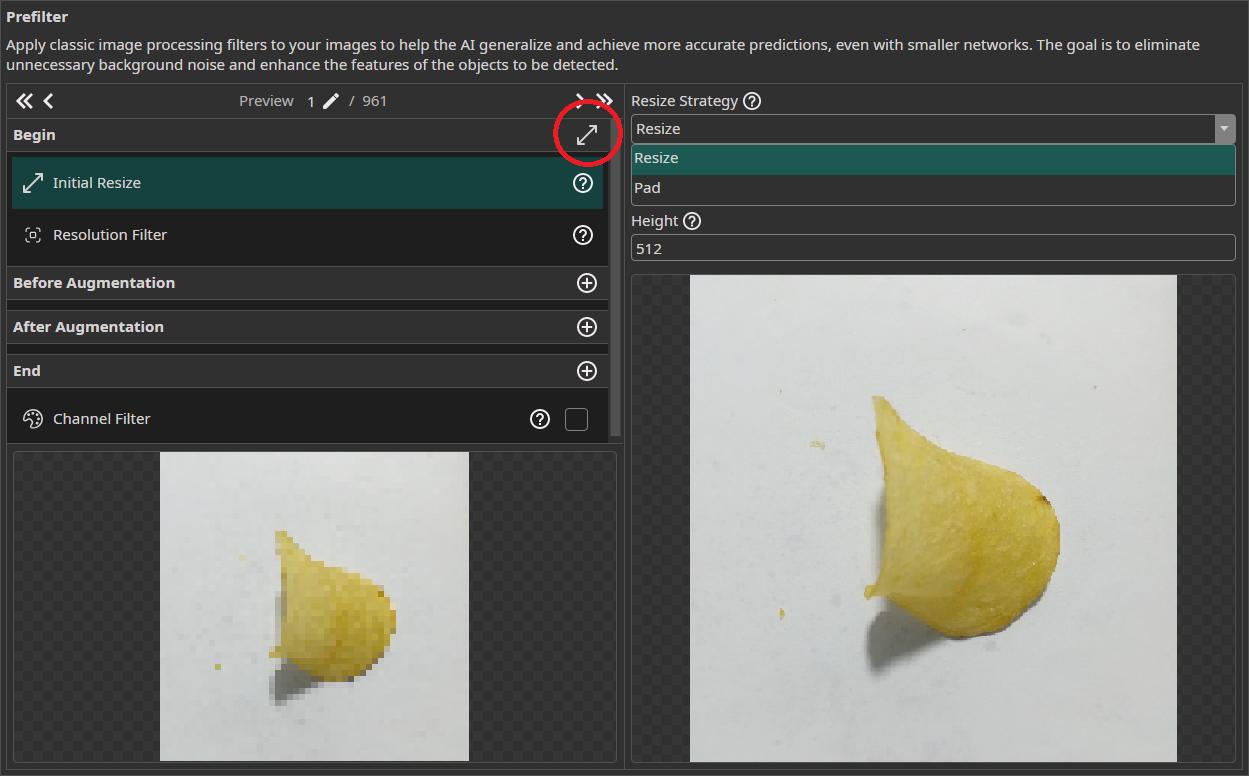
The Initial Resize filter resizes all images to the same size. You can decide between stretching images that have a different size or applying a black padding. You can set the size manually or use the button on the right of Begin to automatically select the size of the largest image.
Resolution Filter
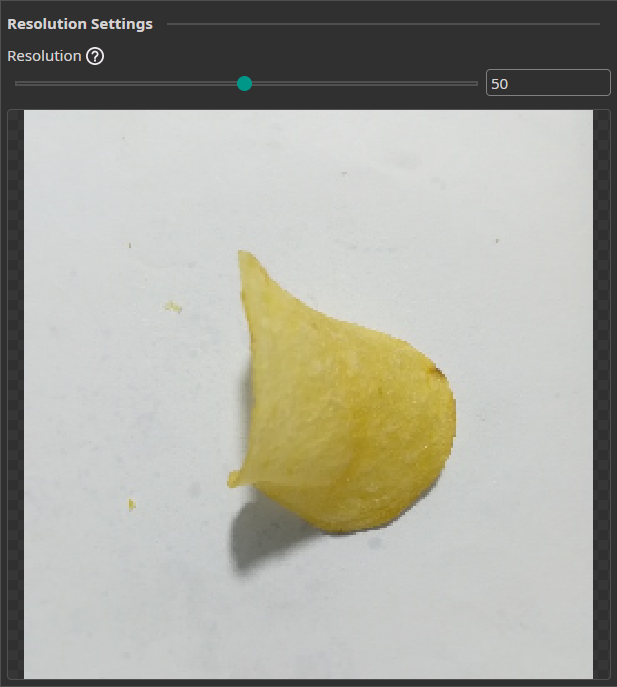
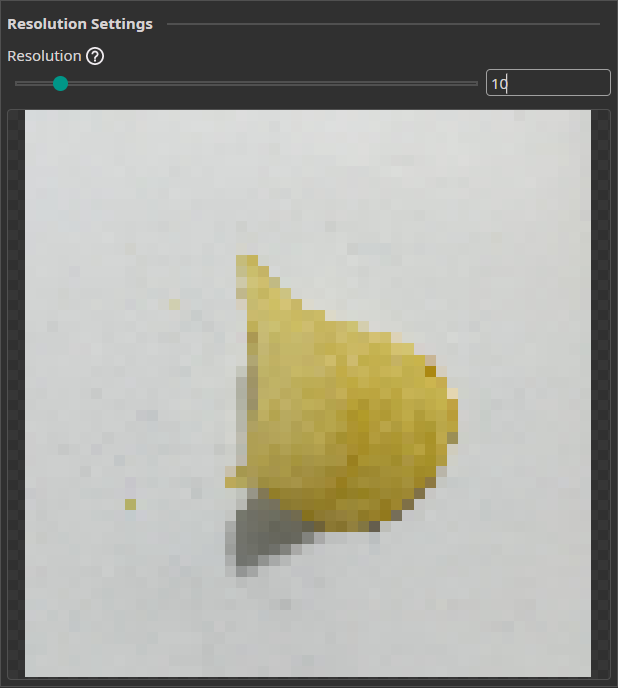
The Resolution Filter allows you to reduce the resolution of your images. This will reduce the prediction time and may even improve the accuracy if the AI struggles with unnecessary details. You need to keep the resolution large enough to preserve key details.
Basic Prefilters
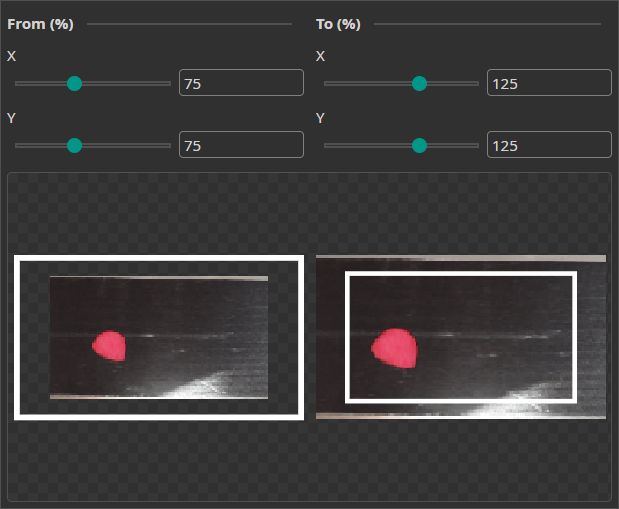
Crop Filter
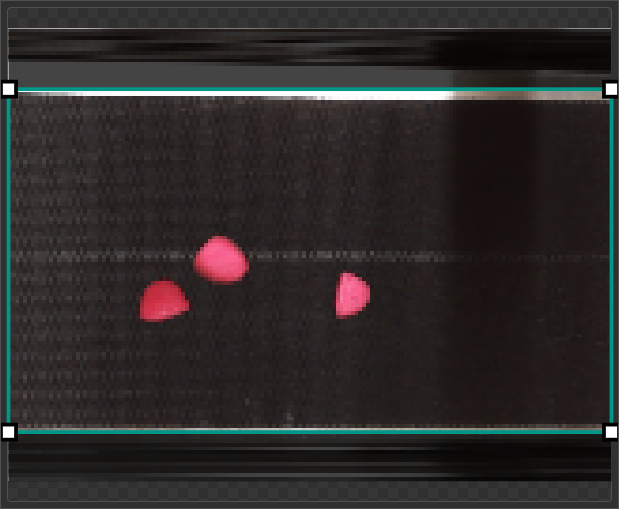
You can use the Crop Filter to crop your images to the area of interest. For example, if your images show objects on a conveyor belt, you can use the crop filter to remove any surrounding areas that are also captured by the camera.
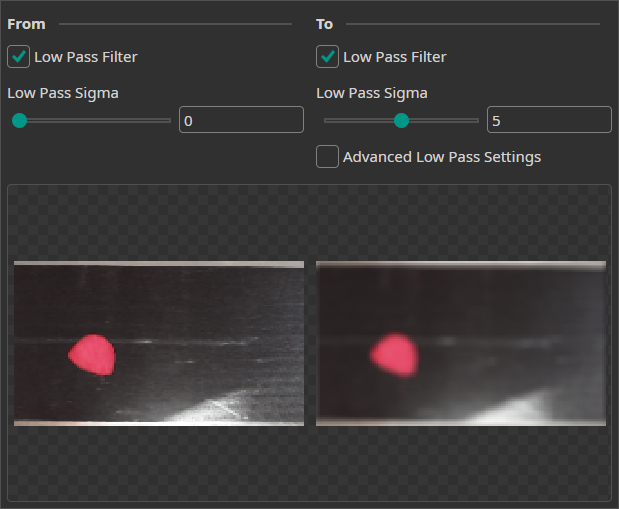
Frequency Filter
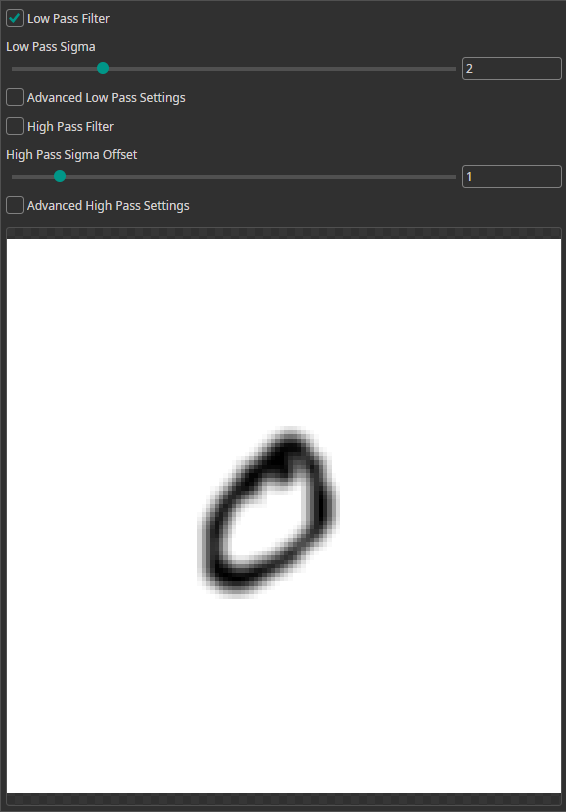

You can use the Frequency Filter to apply low-pass and high-pass filters.
- Low-pass filters allow low frequencies to pass while reducing high frequencies. This removes sharp edges and results in a blurred image.
- High-pass filters do the opposite. They remove areas of uniform color and can be used to highlight edges in images.
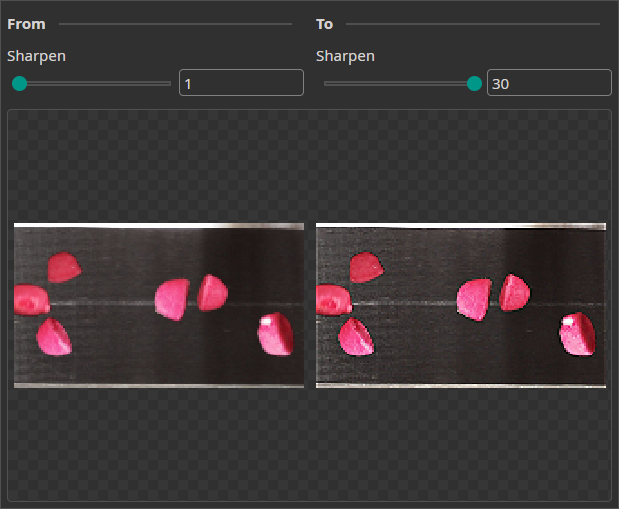
Sharpen Filter

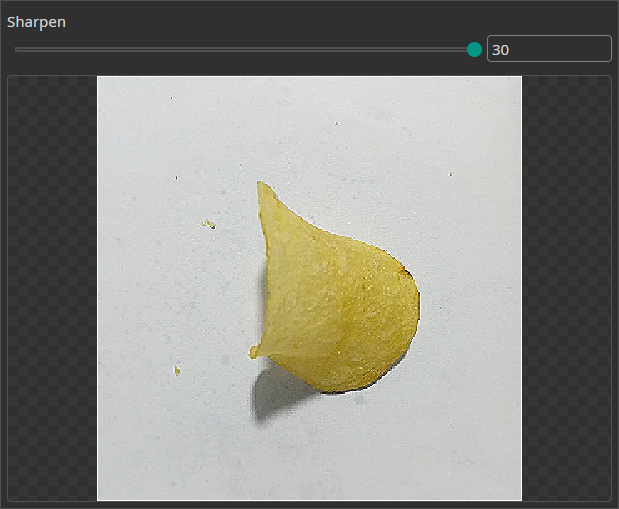
You can use the Sharpen Filter to increase the sharpness of the image and emphasize object edges for an easier detection.
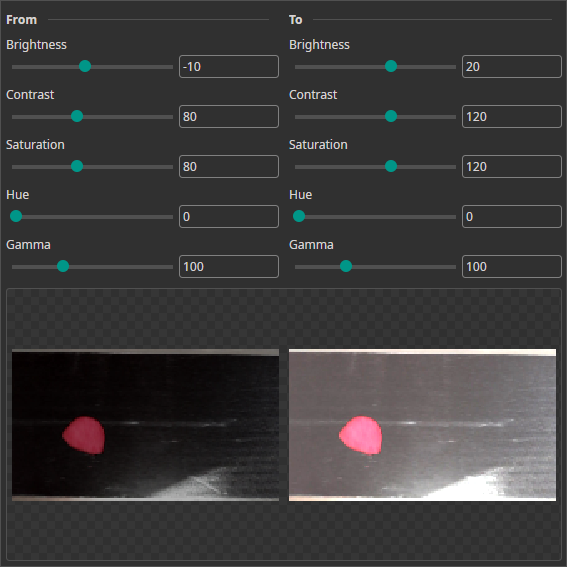
Color Filter
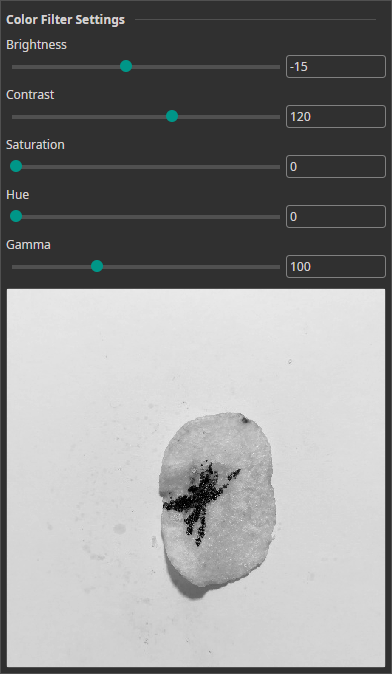

The Color Filter allows you to alter the brightness, contrast, saturation, hue and gamma of your images. You can use it for color correction or for creating a clearer visual separation between objects and background.
Advanced Prefilter Options
Normalize Filter
This filter rescales the image's brightness so that the darkest pixels become black and the brightest pixels become white
Inverse Filter
This filter can be used to compute the inverse of images. For example, you can use it to convert black text on a white background to white text on a black background. This might be useful to you, since neural networks tend to be slightly better at detecting light objects on a dark background than the other way around.
RGB to HSV Filter
The RGB to HSV Filter converts the images from an RGB to an HSV representation. This can be used to apply further filters to the HSV representation before converting the image back to RGB. For example, you can use a Threshold Filter that is applied based on the hue value. This makes it possible to extract objects of a certain color from an image.
HSV ot RGB Filter
This is the counterpart to the RGB to HSV Filter and can be used to convert HSV images back to RGB.
Threshold Filter
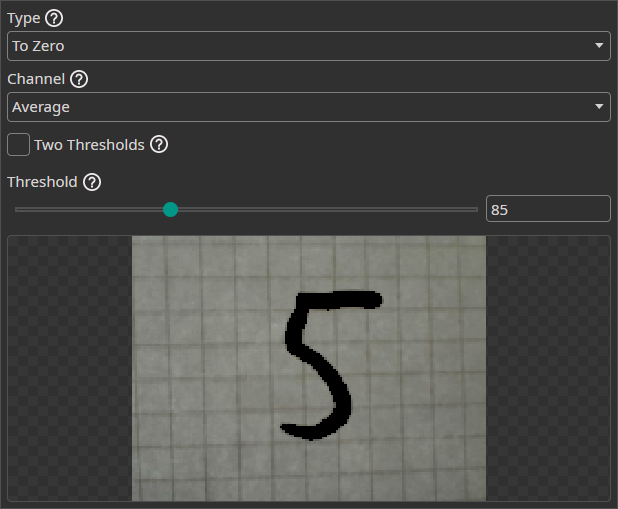
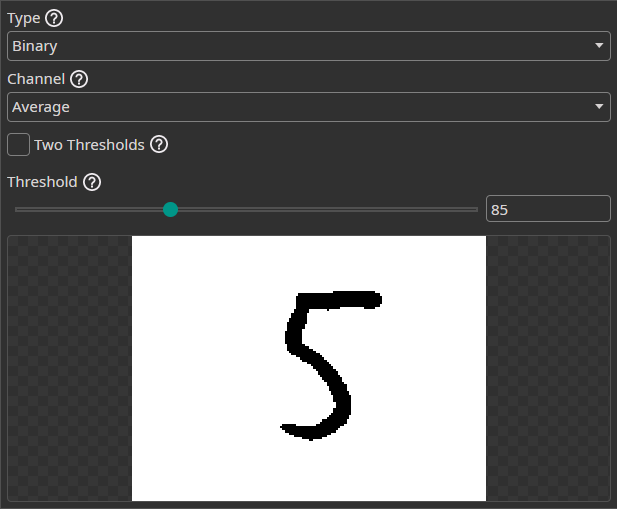
The Threshold Filter removes image areas based on a threshold. You can use this to remove background areas if they can be clearly separated from the objects.
You have the option to apply the following operations:
Binary: Pixels below the threshold are set to black and pixels above the threshold to white.To Zero: Pixels below the threshold are set to black.To One: Pixels below the threshold are set to white.To Zero Inverted: Pixels above the threshold are set to black.To One Inverted: Pixels above the threshold are set to white.
You can select the option to use two thresholds. This changes the operations in the following way:
Binary: Pixels between the thresholds are set to white. Pixels below the first threshold or above the second threshold are set to black.To ZeroandTo One: The operation is applied to pixels below the first threshold or above the second threshold.To Zero InvertedandTo One Inverted: The operation is applied to pixels between the thresholds.
It is possible to check whether the average of all channels is below the threshold or to only use a single channel for the decision. If you use a single channel, you can decide whether the operation is only applied to that channel or all channels. This combines nicely with the RGB to HSV Filter. You can convert your images to HSV and then only keep areas where the hue lies within a set value range.
Channel Filter
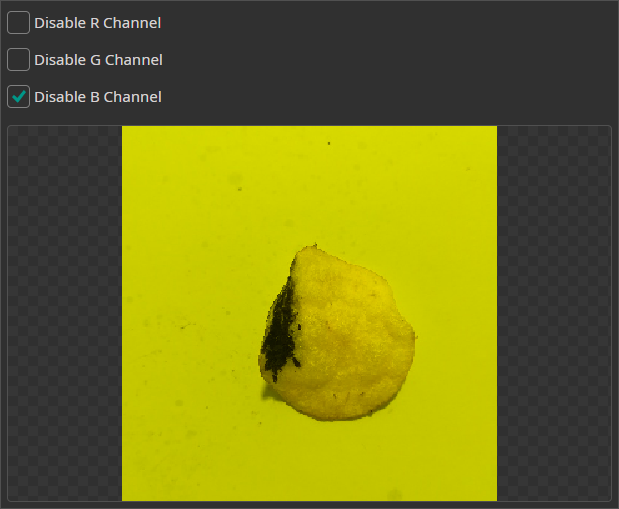
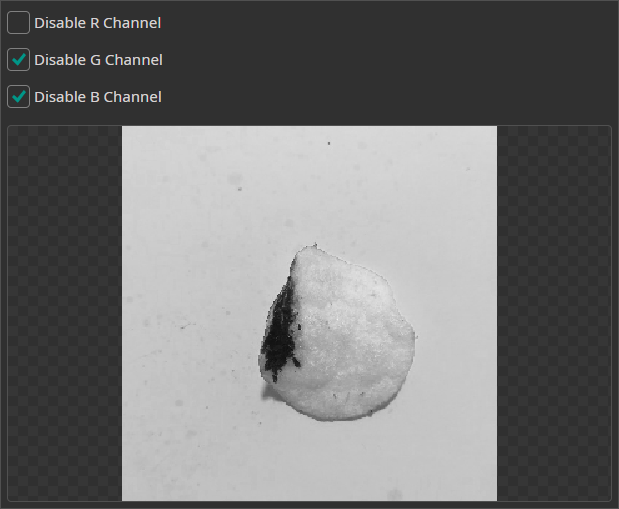
The Channel Filter can be used to remove or isolate specific color channels. This can be used when one of the channels doesn't contain any useful information or contains too much noise.
6. Augmentations
Augmentations are applied during the training with random values within specified ranges. Their purpose is to increase the diversity of the training data, helping the AI to generalize better. By varying the training data, it is possible to increase the size of the dataset without the need to record or annotate additional data. Furthermore, it is possible to make the AI model more robust against certain variations in the data by intentionally reproducing these variations with augmentations.
Move Augmentation
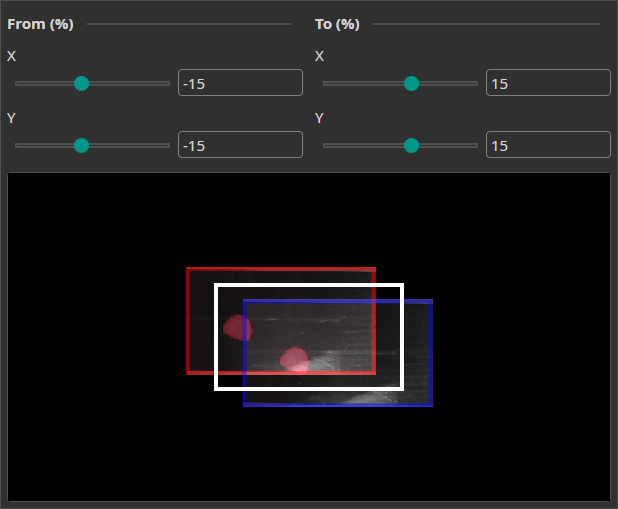
The Move Augmentation shifts the image along the X and Y axes within a specified range. This makes the model more robust against positional variability.
Rotate Augmentation
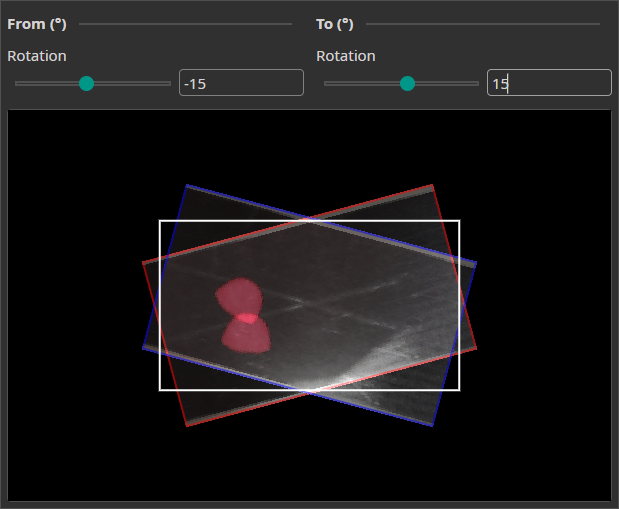
The Rotate Augmentation randomly rotates your images. This helps the model to also recognize objects when they are rotated.
Flip Augmentation
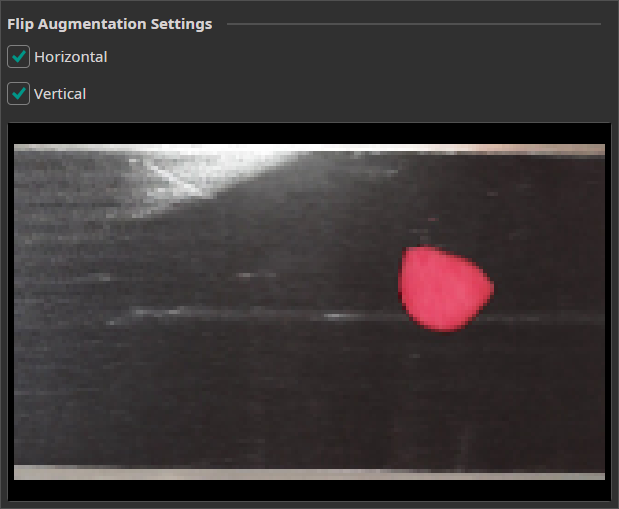
This augmentation can be used to randomly flips the images horizontally and vertically.
Resize Augmentation
The Resize Augmentation scales the image up or down. This makes the model more robust against changes in the object size.
Color Augmentation
This augmentation varies the image's brightness, contrast, saturation, hue and gamma values. It can be used to mimic varying lighting conditions.
Frequency Augmentation
The Frequency Augmentation uses a low-pass filter to blur the images by a random amount. By using it, the model is trained to also make correct predictions when the image is slightly out of focus.
Sharpen Augmentation
The Sharpen Augmentation randomly sharpens the images and has a similar effect as the Frequency Augmentation.
Noise Augmentation

This augmentation adds a random noise to the images to help the model become robust against real-world image imperfections.
7. Model Settings
The Model Settings tab allows you to tune the model generation to your specific needs. You can make further specifications on the parameters you want to predict, e.g. whether you want to predict an objects position and size or whether you only need its position. For achieving the best results, you also need to make some estimates about your task, like specifying the expected size of objects or the overall complexity of the task.
For a more detailed explanation, you can follow this guide on how to set the right parameters.
Output Settings
For Classification Tasks
Classification Type: You can select whether an image can have only one class or whether it can have multiple. Furthermore, you can choose to predict whether at least on class is present or not.
For Object Detection Tasks
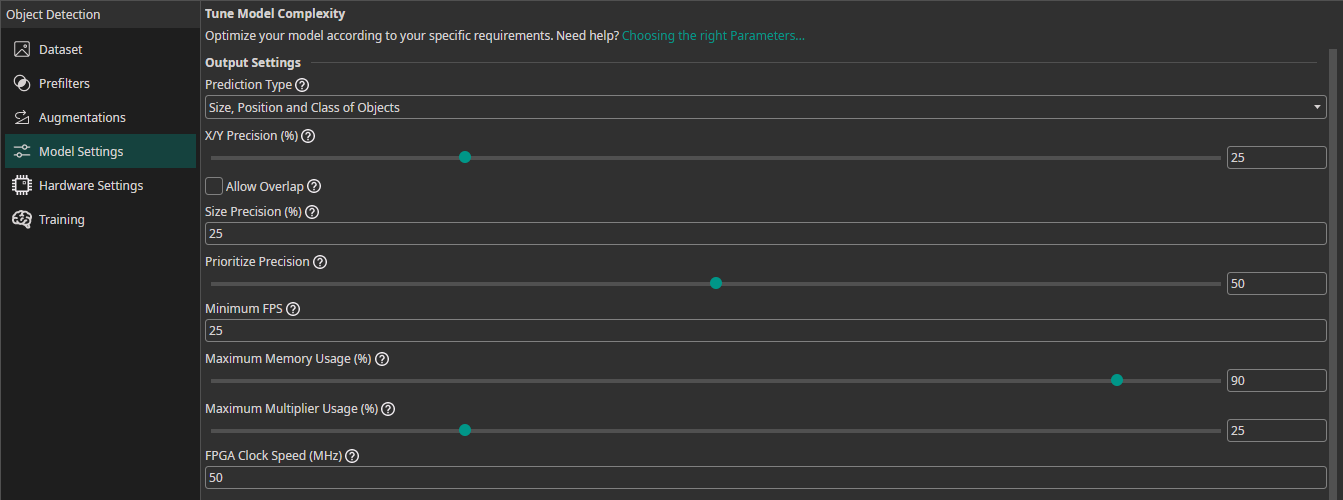
Prediction Type: You can choose from multiple different options what parameters your model needs to predict. If you need to predict fewer parameters, ONE AI is able to generate a simpler model that requires fewer computations.Size, Position and Class of Objects: The model predicts the size, position and class for each detected object.Position and Class of Objects: The model only predicts the position and class of detected objects. This setting is useful when you already know the size of the objects, e.g. because they are filmed on a conveyor belt and always have the same size.All Present Object-Classes: The model only predicts whether different objects are present in the image but provides no further information. This option might be used for quality control to detect the presence of different types of defects.Class with Largest Combined Object Area: The model predicts the object class that occupies the largest combined area within the image.Class with Most Objects: The model predicts the object class that appears in the image the most.At Least One Object? (Y/N): The model predicts whether at least one object is present in the image or not.
X/Y Precision (%): You can set a precision level for the predicting object position. Choosing a lower precision increases the speed of the model and helps it to generalize better. By reducing the precision, you effectively reduce the resolution of its predictions. For example, if you set the X/Y precision to 25%, only every fourth pixel can be chosen as the position of a detected object.Allow Overlap: You can decide whether multiple objects that fall into the same grid cell are detected separately or merged together.Size Precision (%): By setting the size precision, you can directly control the amount of computations that are spent on predicting the object's size. A higher precision improves the predictions but increases the computational load.Prioritize Precision: You can adjust the model's balance between false positives and false negatives. For example, if it is important for your use case to detect a defect in almost all cases and it's acceptable to have some false detections, you should lower this setting. If you want to have a balanced approach, you should set it to 50%.
Hardware Usage Settings
Minimum FPS: The minimum predictions per second the model needs to perform with hardware selected in theHardware Settingstab.Maximum Memory Usage (%): You can limit the amount of memory that the predicted model will use.Maximum Multiplier Usage (%): You can also limit the amount of DSP elements that the predicted model can use. If you aren't using an FPGA this setting is ignored.FPGA Clock Speed (MHz): If you are using an FPGA, you need to provide its clock speed. Otherwise, this setting is ignored.
Input Settings
To achieve the best results, you need to provide some additional information about your task. ONE AI will use this information to tailor the generated model to your individual use case.
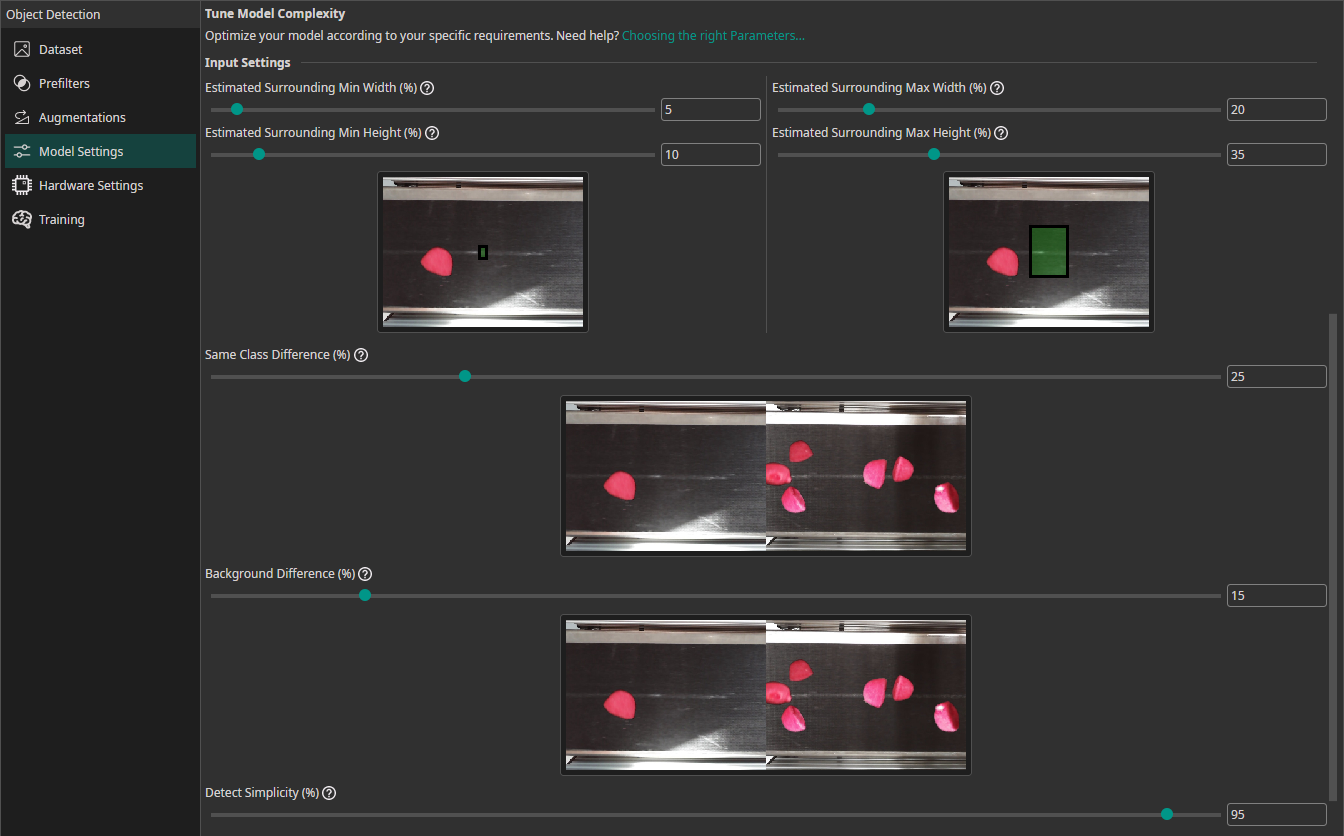
Estimated Surrounding Min Width (%): For this setting, you need to estimate the width of the area that the model needs to analyze to detect the smallest objects in your dataset. For classification tasks, this setting describes the width of the smallest area that the model needs to analyze to make the correct decision.Estimated Surrounding Min Height (%): Estimate the height of the area required to detect the smallest objects.Estimated Surrounding Max Width (%): Estimate the width of the area required to detect the largest objects.Estimated Surrounding Max Height (%): Estimate the height of the area required to detect the largest objects.Same Class Difference: For this setting, you need to estimate how different the objects in one class are.Background Difference: Estimate how much the backgrounds vary in the images.Detect Simplicity (%): Give an estimate for your task's overall difficulty.
For Classification Tasks
If you are training a classification model, you need to provide some additional information:
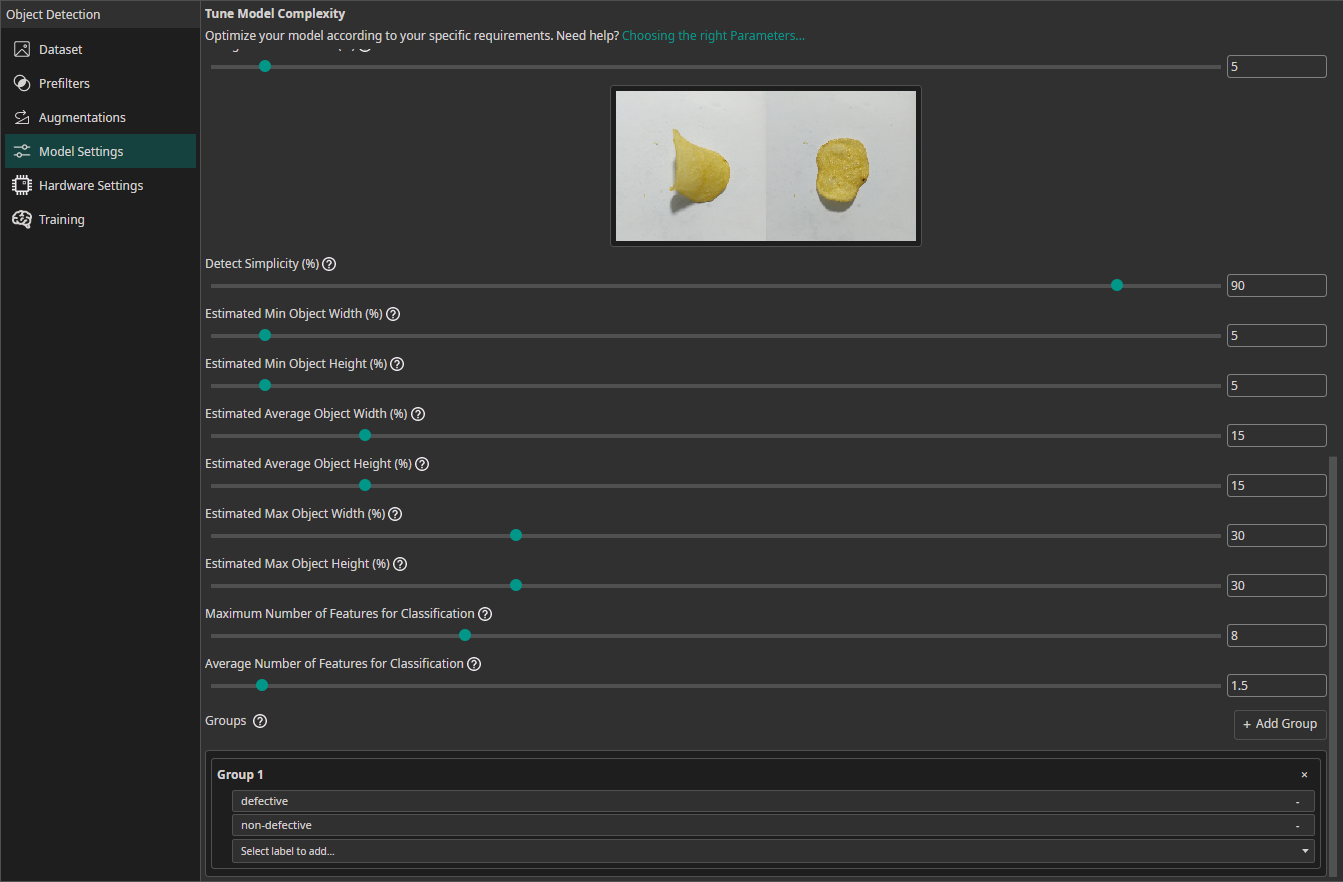
Estimated Min Object Width (%): Estimate the width of the smallest area that the model needs to analyze to make the correct decision.Estimated Min Object Height (%): Estimate the height of the smallest area relevant for the classification.Estimated Average Object Width (%): Estimate the width of the average area relevant for the classification.Estimated Average Object Height (%): Estimate the height of the average area relevant for the classification.Estimated Max Object Width (%): Estimate the width of the largest area relevant for the classification.Estimated Max Object Height (%): Estimate the height of the largest area relevant for the classification.Maximum Number of Features for Classification: This setting describes the maximum number of image features that may be relevant for a classification task.Average Number of Features for Classification: The average number of relevant features used for the classification.Groups(also available for object detection tasks): This setting is intended for advanced users. We recommend leaving all classes in one group unless you know what you are doing. By splitting the classes into multiple groups, you can divide your task onto multiple sub-models. ONE AI will generate an individual sub-model for each group that only predicts the classes that belong to that group. The sub-models are then joined to create a single unified model. This approach is practical if you have objects with significantly different sizes, e.g. long scratches and small nicks. By dividing the task onto sub-models, one model can focus on the large defects while the other focuses on the tiny defects.
8. Hardware Settings
The Hardware Settings tab allows you to specify the target hardware that your model will be deployed on. You have the option to select a predefined hardware or to define custom hardware resources. ONE AI will create a model that is optimized for your hardware and will run within the constraints that were specified in the Model Settings.
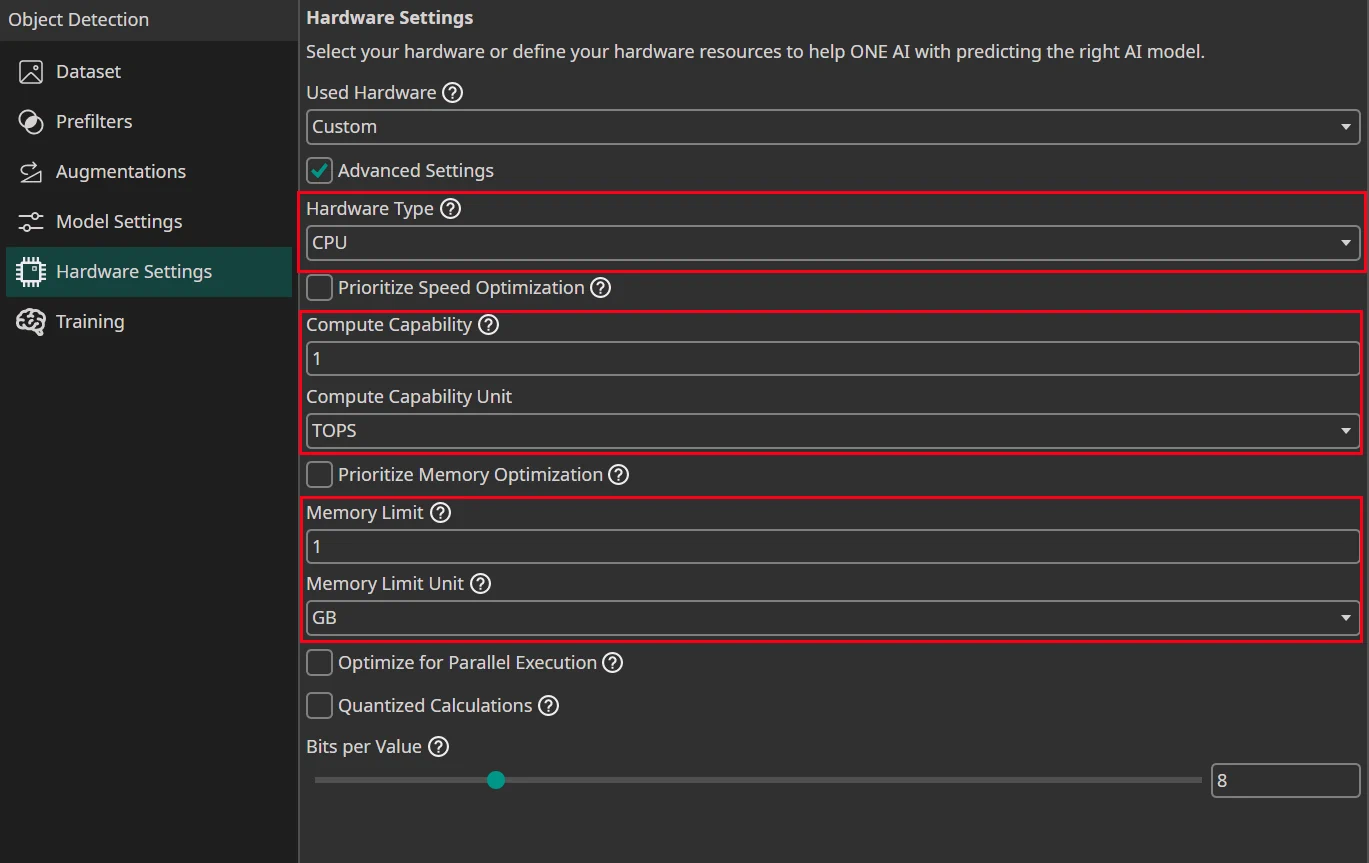
The important settings are just the Hardware Type, the Compute Capability how fast your hardware can do calculations and the Memory Limit how much RAM is available for the calculations.
Quantized Calculations are important as well when you want to export to a microcontroller, TPU or FPGA.
Used Hardware
You have the option to select select a preconfigured hardware. If you want to use a different hardware, you can select Custom and enter the hardware specifications in the advanced settings.
Advanced Settings
Hardware Type: Select the hardware type:Prioritize Speed Optimization: Enable this if your hardware, such as a microcontroller, has limited computational capabilities and benefits from a prioritization of speed over memory usage.Compute Capability: Specify the computational power of your hardware.Compute Capability Unit: The unit you used to specify theCompute Capability.8 Bit Multipliers (DSP Blocks): Define the amount of 8 bit multipliers of your FPGA.8 Bit Multipliers with Sum per DSP Block: The amount of multipliers with sum that is available on your FPGA.Prioritize Memory Optimization: Enable this if your hardware, such as an FPGA with limited internal RAM, requires efficient memory usage for higher accuracy with fewer model parameters.Memory Limit: Define the amount of available memory. The type of memory depends on your hardware. For example, a GPU would use its VRAM while a CPU would use the system RAM. You can look at the tooltip for more information.Memory Limit Unit: The unit you used to specify theMemory Limit.Optimize for Parallel Execution: Select this option if you plan to implement the AI as a parallel architecture on FPGAs or ASICs.Quantized Calculations: Enable quantization to boost performance. This can slightly reduce accuracy but significantly increases speed. For most applications, especially on microcontrollers, TPUs, FPGAs, or ASICs, quantization is highly recommended.Bits per Value: Set the precision level for neural network calculations.
9. Training
For these steps you need to be connected to the ONE AI Cloud
Ensure that your training data is uploaded, labeled, and properly prepared. This includes applying any necessary prefilters and selecting the most effective augmentations. Once your data is ready, double-check your model and hardware settings before starting the training process
Training a new AI Model
You can create new AI model instances, so you can save old trained models and try out new ones.
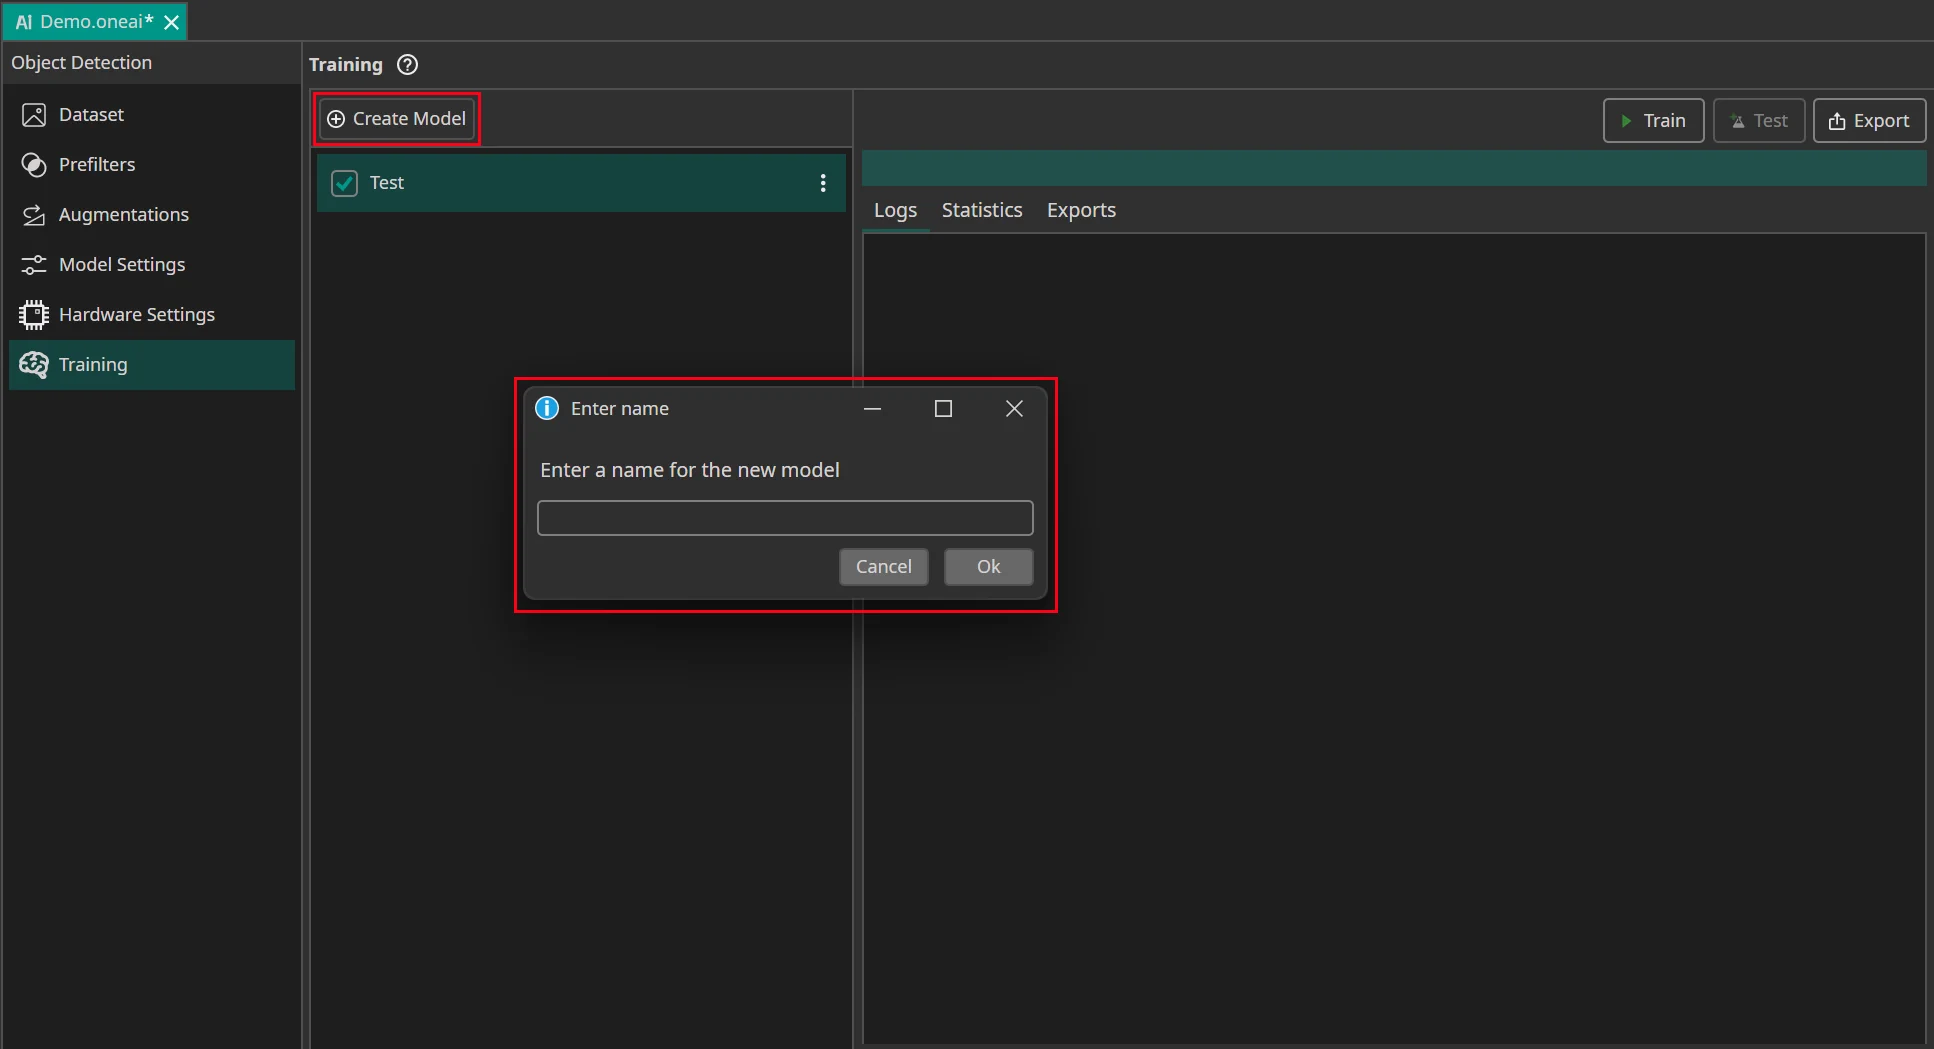
Select the model you want to train with the current data and settings. Then click on the Train button.

First, you need to specify for how long you want to train your model. A detailed guide what training time works best can be found here. You can also use early stopping to end the training early if the model doesn't improve any more. To do so you need to set the Patience for Early Stopping. For example, if you set the training time to an hour and the patience to 10%, the training is stopped early if the model doesn't improve for six minutes.
If you want to export a quantized model, you should Enable Quantization Optimization. Quantization reduces the amount of bits that are used to represent the model weights. This reduces the size of the model and increases its speed while only slightly decreasing its accuracy. This is a huge advantage if you intend to run your model on an FPGA or a microcontroller.
If you enable quantization, you can use the Percentage Quantization Optimization setting to control the percentage of training time that is dedicated to fine-tuning quantized calculations. While quantization aware training improves the performance of quantized models, it also slows down training, so it is a good idea to start the training normally and switch to quantization aware training later on. A good tradeoff between training time and model performance is at 30%, but if you want the best performing model, you should set the percentage to 100%.
The next setting allows you to choose whether you only want to train your model on images that contain objects. This allows the model to learn faster how objects look and how to detect them, but the model also spends less time learning how to correctly identify the background.
Finally, if you selected a model that was already trained before, you can decide whether you want to continue its training or override the existing model. If you are training the model for the first time, this setting is ignored.
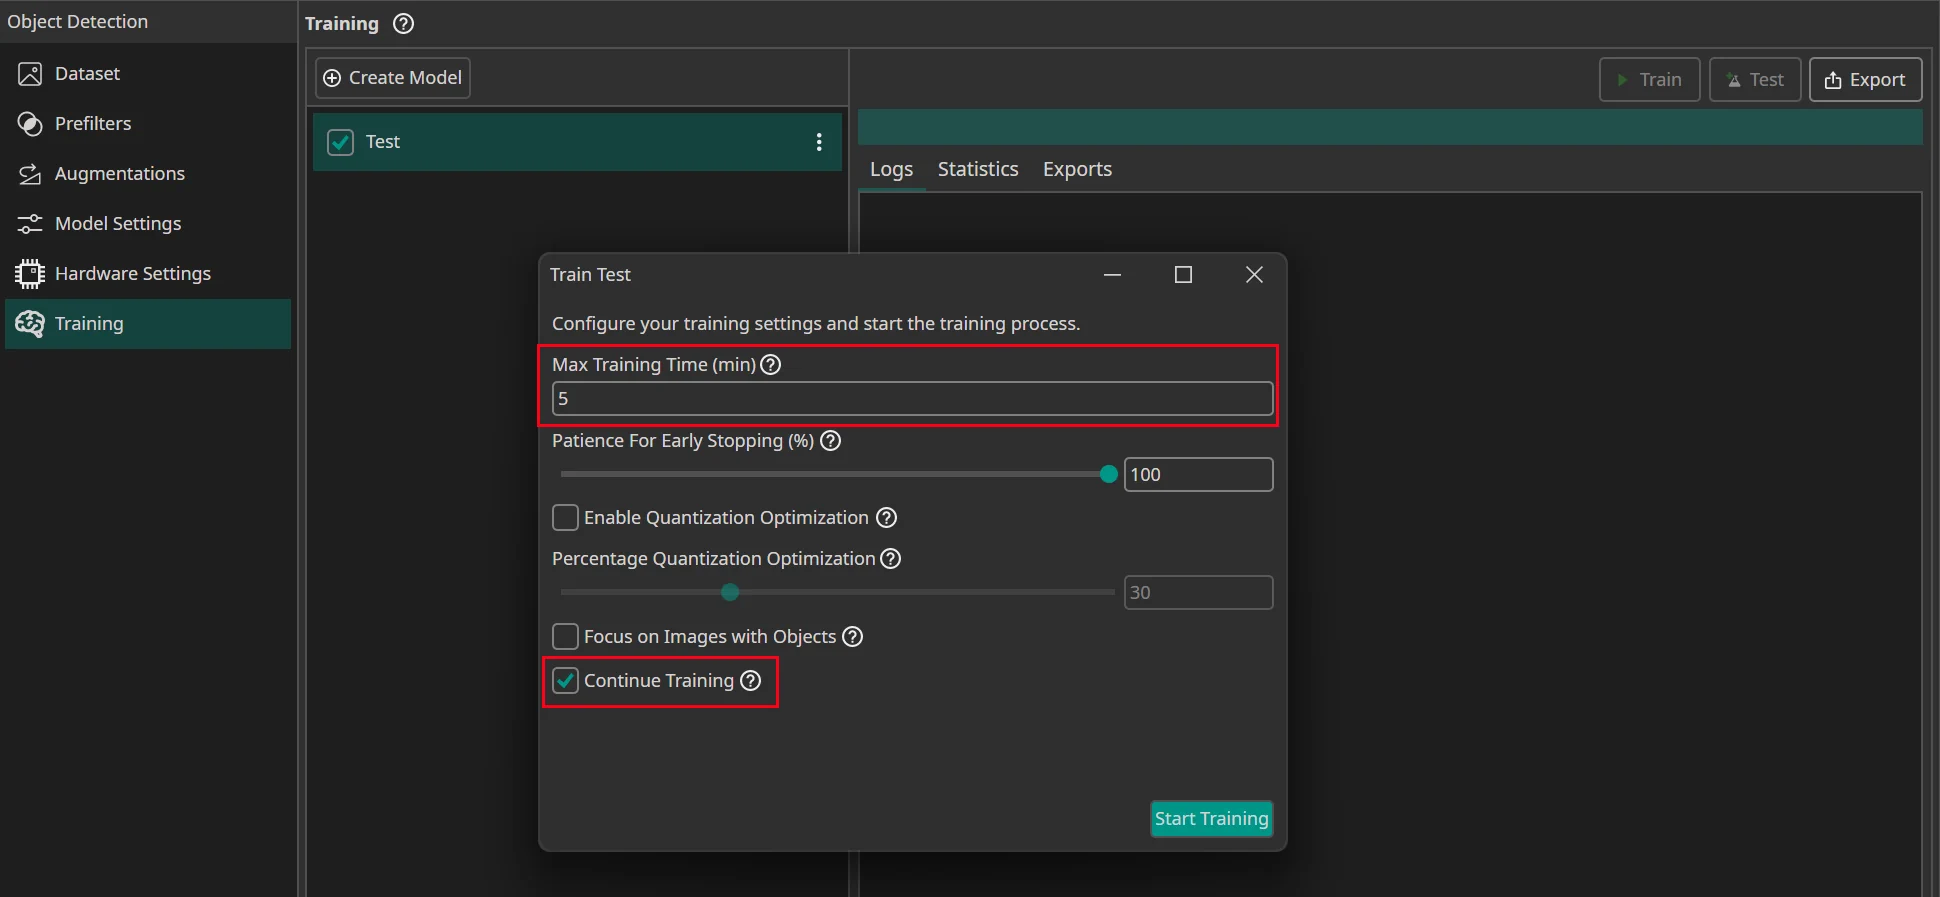
After you press on Start Training, you see how many Credits the training will cost. If you use early stopping, the costs can be less than that, because the training might end early if there are no further improvements. The total time is always a bit higher than the training time, since the data needs to be uploaded and preprocessed, but you only pay for the time the AI is actually trained on the server.
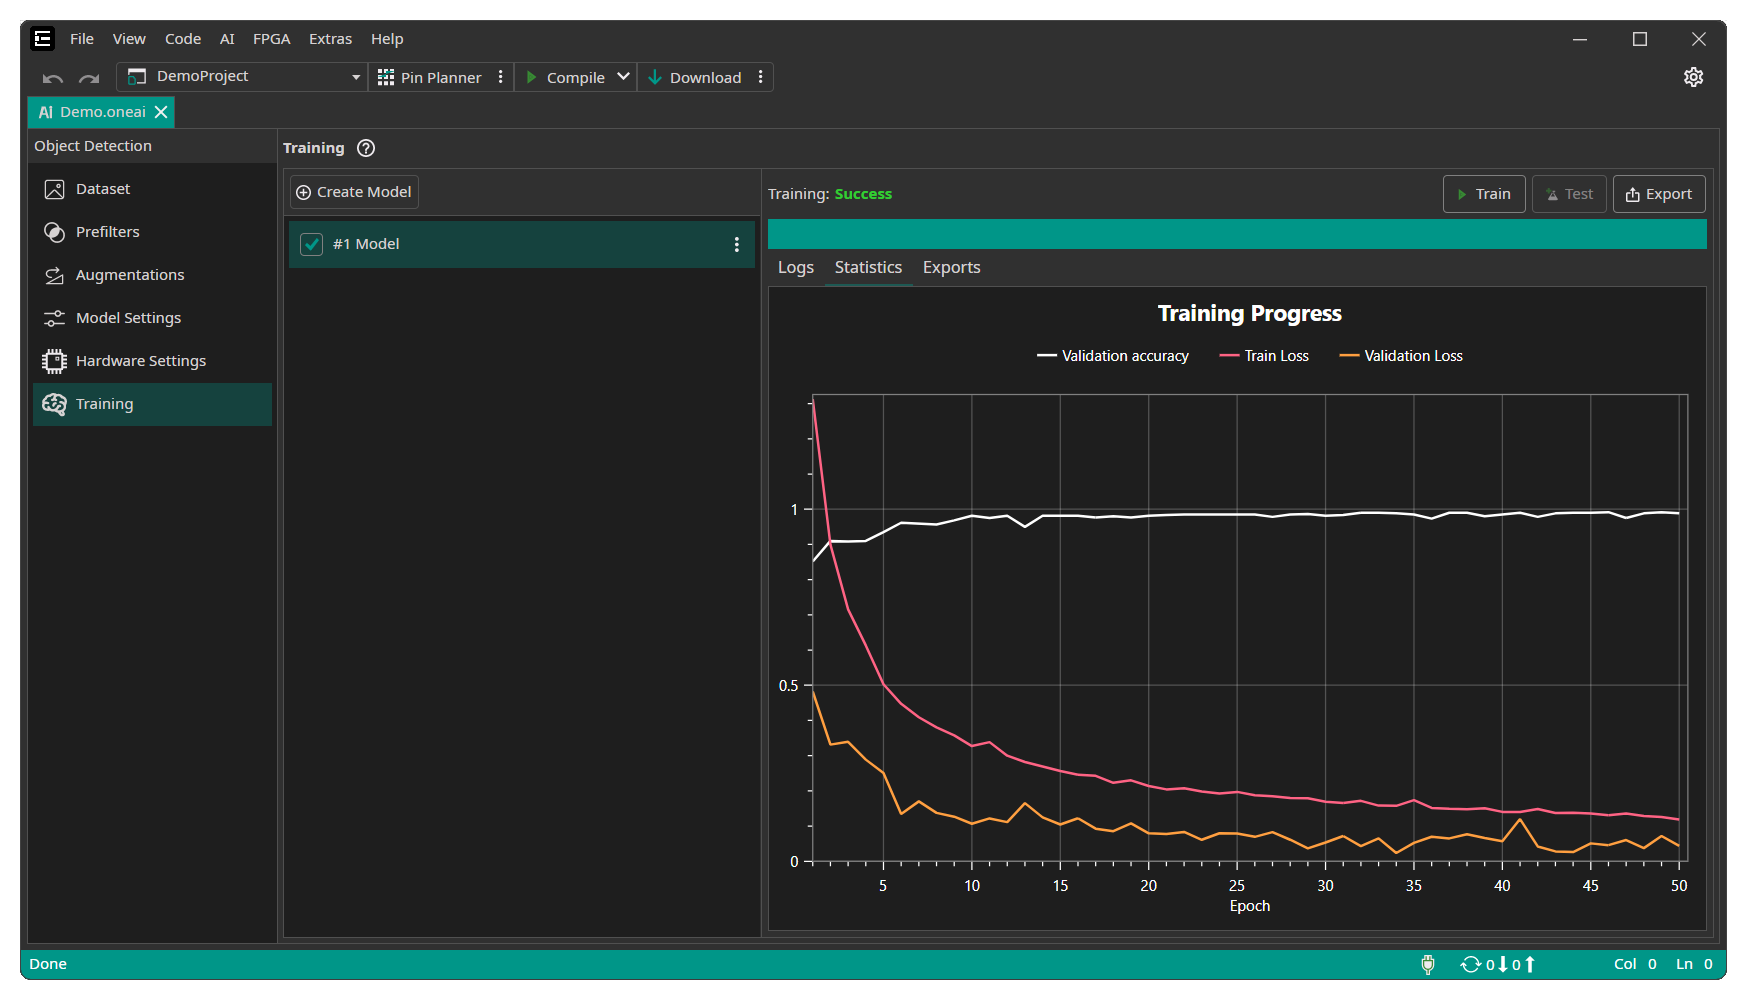
During the training you can see the current training progress in the Statistics tab. You can stop the training manually if you see no further improvements after a longer time of training.
Exporting a trained Model
To test your AI model, you can export it as an AI model or as a complete project by clicking on the Export button.

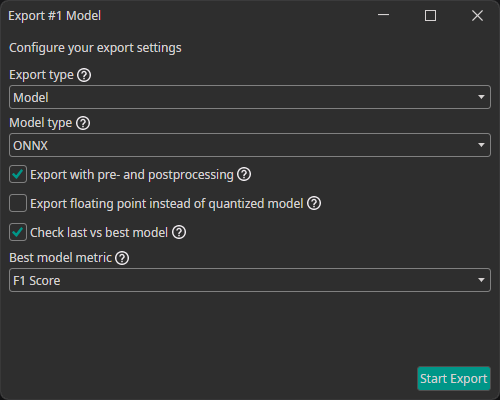
This opens the export window, which allows you to configure different settings for the export:
Export type: You can choose whether you want to export just the model as a file (model) or to export it along with execution routines in various languages either compiled as an executable binary (executable) or as source code (project).Model type: There are different model types that can be generated:TensorFlow: The standard TensorFlow model format.TensorFlow Lite: The TensorFlow Lite format is optimized for mobile and embedded devices. You can use this for microcontrollers, FPGAs with processors and other efficient AI implementation on processors.ONNX: The Open Neural Network Exchange format ensures compatibility across different frameworks. It is also used by OneWare Studio for running a live preview of the model and for auto-labeling data. Currently, the ONNX export doesn't support quantized models. If you export an ONNX model, the progress of the quantization aware training will be ignored.VHDL: A hardware description language output that is used for bare metal FPGA implementations.
Export with pre- and postprocessing: If you select this option, the pre- and postprocessing layers are included in the exported model. This simplifies integrating the model in your existing processes and ensures consistency between training and inference.Export floating point instead of quantized model: You have the option to always export a floating point model, even if you used quantization aware training. This means that any progress of the quantization aware training is ignored.Check last vs best model: During the training, ONE AI saves two models: the latest and the one with the best validation metrics (excluding Non-Maximum Suppression). If you enable this option, ONE AI checks which of the two models performs best when all post-processing steps are applied. Furthermore, you are able to specify which metric you want to use for this comparison.Best model metric: The metric that is used when comparing the best and the last model.
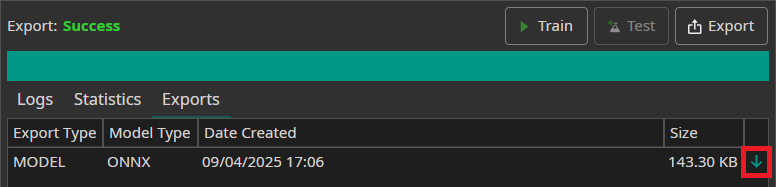
After the export is finished, the model can be download in the Exports tab by clicking on the green arrow.
10. Using Your Model in OneWare Studio
Evaluating the Model on Live Data
You can use the Camera Tool to evaluate the performance of your model on live data. To do so, you need to export the trained model as an ONNX model. After downloading it, the model becomes available in OneWare Studio automatically. Now, you need to open the Camera Tool by clicking on AI in the menu bar and selecting Camera Tool.
In the Live Preview tab, you can select the model that you want to use as well as the camera. You also need to select whether you are using a Classification or an Object Detection model in the Preview Mode. After you click on the play button, the model will start running on your local machine. If you have an object detection task, the predicted bounding boxes will be drawn directly onto the preview. For classification tasks, the predicted class is displayed in the bottom right corner.

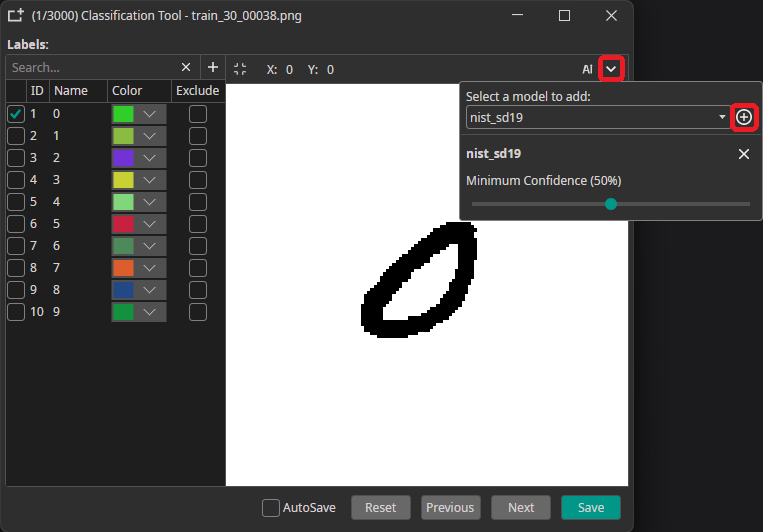
Using the Model to Annotate New Data
You can use a trained model to predict the annotations for new images, which greatly speeds up the annotation process. To use this feature, you need to export your export and download your trained model as an ONNX model. Next, you go to the Dataset tab and click on an image to open the annotation tool. There, you click on the arrow in the top-right corner, select your model and click on the plus icon. Here, you can also configure a Minimum Confidence that is required for the predictions to be applied. Only classes and objects whose predicted confidence exceed this setting are added to the annotations.
To predict the annotation for the current image, you need to click on the AI button in the top-right corner. This automatically applies the prediction, but you can discard it by pressing the Reset button. If the model makes a wrong prediction you can correct it afterwards, which still might be faster than doing the annotation completely manually.
One common approach for speeding up the annotation process is to only annotate a part of the dataset manually. This data is used to train a model, which in turn is used to aid in the annotation of the remaining data. Depending on the size of your dataset you might even repeat these steps multiple times to improve the predicted annotations as the model is trained with more and more data.
11. Examples
Check out our examples like: